[content-section top=”100″ bottom=”160″ classes=”main-content home-page”]
The Complete Guide to Facebook Ads for Dentists
You need traffic.
You want more clients.
You want more exposure.
You want more revenue.
Sure you can invest time and energy attempting to get on the first page of Google. You can optimize your new website. You can write blog articles that your visitors and followers love. You can do all the things that guarantee you long term success online.
But what if you need online traffic NOW?
I can tell you all the ways something like a strong social media following or a huge email list can help your business generate traffic but the reality is, if you need immediate traffic pay-per-click advertising (PPC) is the solution.
Now that the number of users on Facebook has surpassed billions its advertising tools have become essential for many marketers.
Ads published to Facebook’s ad network have the potential to reach thousands of active users everyday. As of writing this there are over 4 million advertisers cashing in on Facebook’s ad platform to reach their target customers.
In this article I’ll give you an overview of Facebook advertising and show you how it can benefit your dental business.
What Makes Facebook Advertising so Effective?
If you’ve been an active user of Facebook you’ve likely seen your fair share of Facebook Ads. Most of which I’m guessing, have been catered towards areas of your own personal interest.
What makes Facebook’s advertising platform different from others is its ability to target users by their interests and preferences.
Every single user on Facebook is constantly being tracked (whether they like it or not). Every video you click, every status and page you like, is being fed into Facebook’s profile on you. Facebook knows what you like, what you hate, what you’re willing to watch and what you ignore.
By knowing all of this Facebook acts like an expert profiler that serves advertising it believes you’ll be interested in. Do you follow all the best makeup and fashion pages? Perhaps you’ll be interested in this ad for Sephora’s latest line of YSL lipstick…
You get the point. Facebook features robust targeting tools that allow advertisers and marketers to pinpoint their consumers based on interests, competitor affiliations, demographics, and much more.
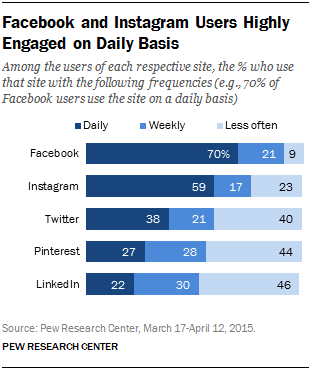
Add in the option to advertise to Instagram’s millions of users plus rich media like video, and it’s no wonder why Facebook’s ad platform has grown as much as it has.
Compared to other ad networks like Google AdWords for example, Facebook ads can be thought of a much better platform for exposure. Because of Facebook’s sheer number of users and targeting, ads are shown at much higher rate and at comparably less cost in most cases.
As I’ll explain later advertisers have the ability to pay only when people click on their ads which allows their budget to be stretched much further.
Now that I’ve explain what makes Facebook advertising so effective, let’s move onto creating and publishing a Facebook campaign.
Step-by-Step Guide to Creating a Facebook Ad Campaign
Step 1
Here’s where you’ll be spending the majority of your time, the Facebook Ad Manager platform.
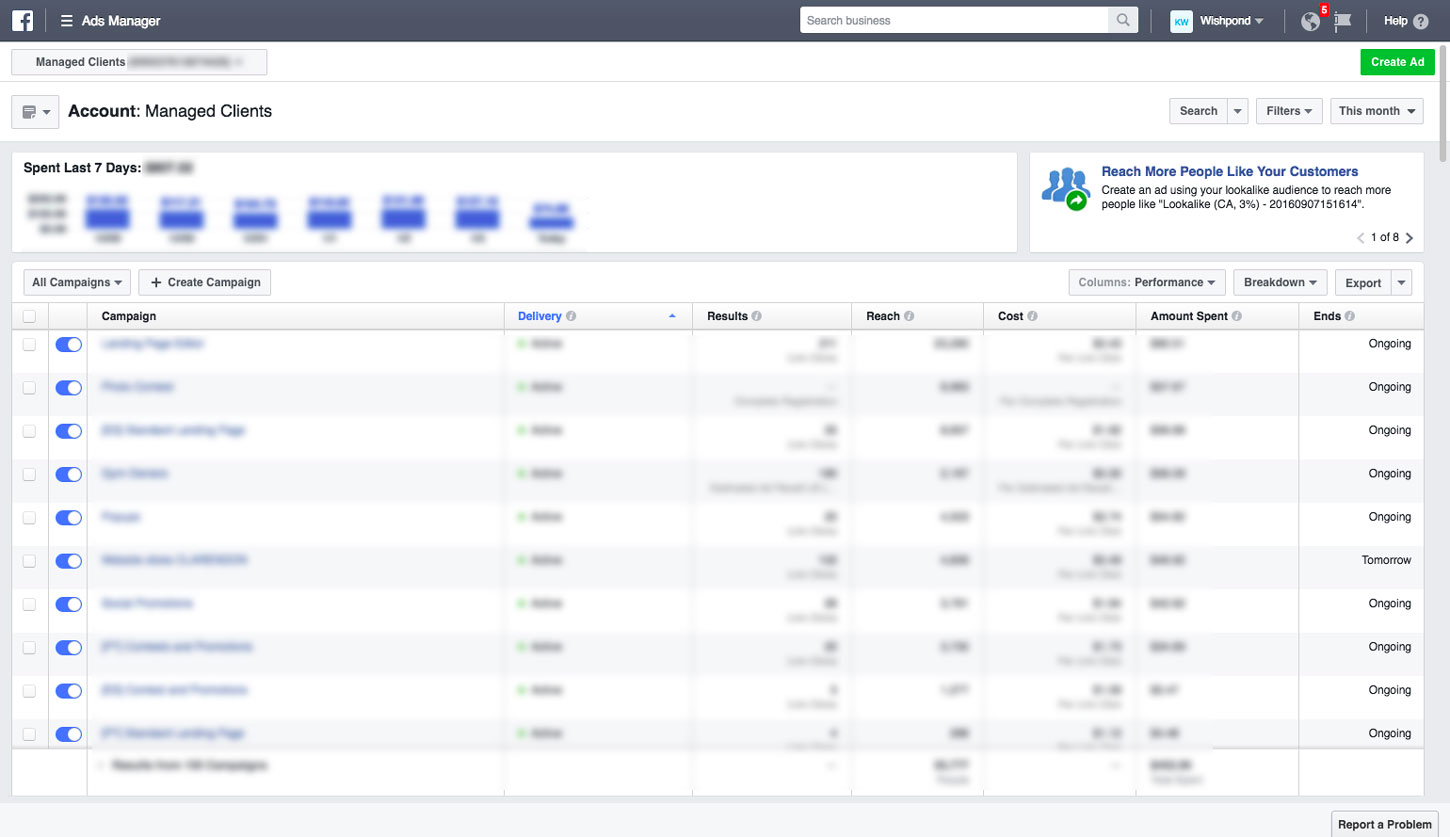
Click on “+ Create Campaign” to begin.
You’ll be taken to select your campaign’s objective.

There are 3 campaign objectives to select from…
- Awareness. Get your ad in front of as much of your target audience as possible.
- Consideration. Make those who are already aware of your business take action and invest a little more.
- Conversion. Make those who are already considering a purchase convert now.
The campaign objective that you choose will depend on the goal you want to accomplish.
In our case, we’d like to generate awareness for our new family dental practice. We’ll choose “Reach people near your business” to drive awareness for the people near our dental practice.
Step 2
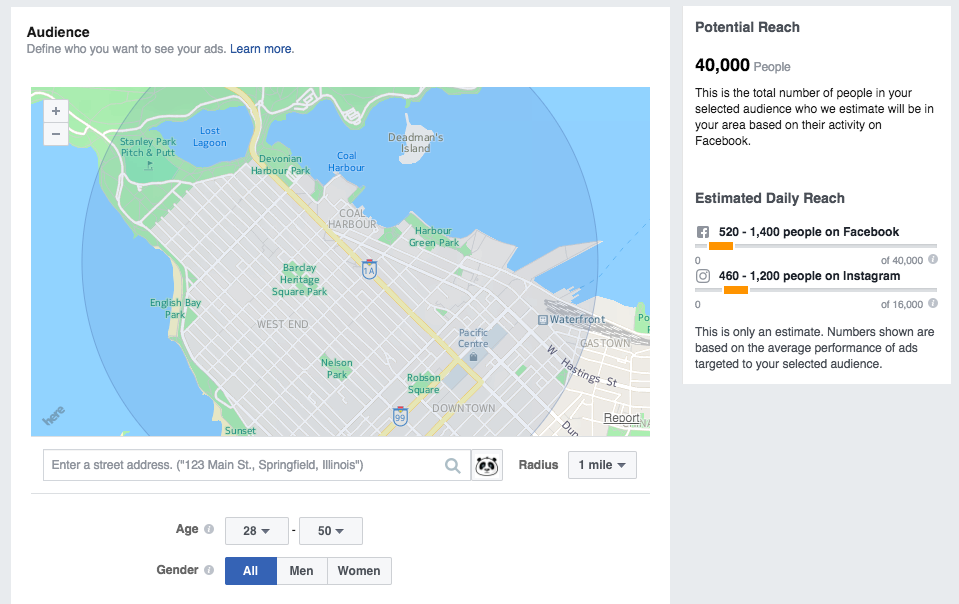
Now we’ll choose the audience we’d like to target.
For our local dental practice we’d only like our ads to show to those in our immediate area. In this case I’ll select a 1 mile radius that encompasses Vancouver’s downtown core.
Because this is a family dental practice I’ll assume my audience have children thus are older, 28-50. Remember the more you know about your target audience, the easier it will be for Facebook to find them.
Step 3
Next we’ll have to decide on where we want our ads to be placed.
Your choices are…
- Facebook. Choose to have your ads shown in the Facebook News Feed, the right column, or both.
- Instagram. Everyone’s favourite mobile photo sharing app.
- Audience Network. Facebook partner companies.
- Messenger. On Facebook’s popular messaging app.
In the advanced options below you can choose to ignore mobile devices or specific operating systems incase your website has compatibility issues. It’s important to know that more than 50% of all web browsing is done from a mobile device. If your website isn’t mobile friendly it’s something to consider changing in the near future.
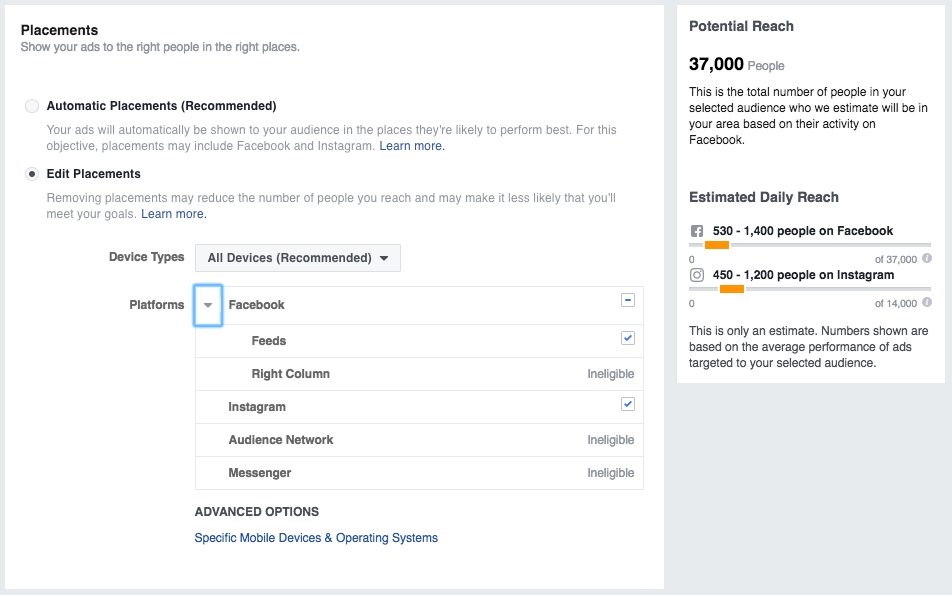
For our family dental practice I’ll stick to only advertising on Facebook because I’m not confident that an Instagram user will be interested in family dental services. Keep in mind that this would definitely be something I’d test in the future.
Lastly we’ll enter in our daily budget or lifetime budget. If you want to run your ads indefinitely then choose daily. If you have a set timeline choose lifetime budget. Same goes with choosing a schedule.
Since we’re only trying to build awareness, I’ll choose to spend $5 a day indefinitely.
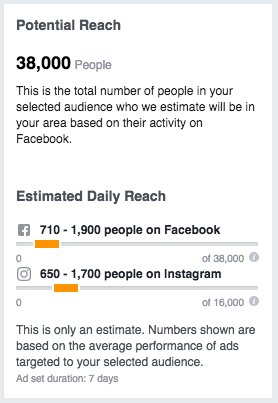
Your budget will ideally come down to your customer acquisition costs. How much a new client is worth to you. According to our inputs our ad should reach approximately 710-1,900 people everyday.
Below the budget and scheduling options you’ll have options for setting an ad schedule if you set a lifetime budget. Click “More Options.” This will allow you to have your ads run only at specified hours of the day. I doubt anyone will be interested in exploring dental options at 4am so I can choose to eliminate that timeframe from the schedule.

Step 4
At this point we’re ready to create our ads. Hopefully by this point you’ve already decided what type of advertisement you’d like to run.
We have 4 choices each with different features:
- A single image.
- A carousel of images.
- A video.
- A video slideshow.
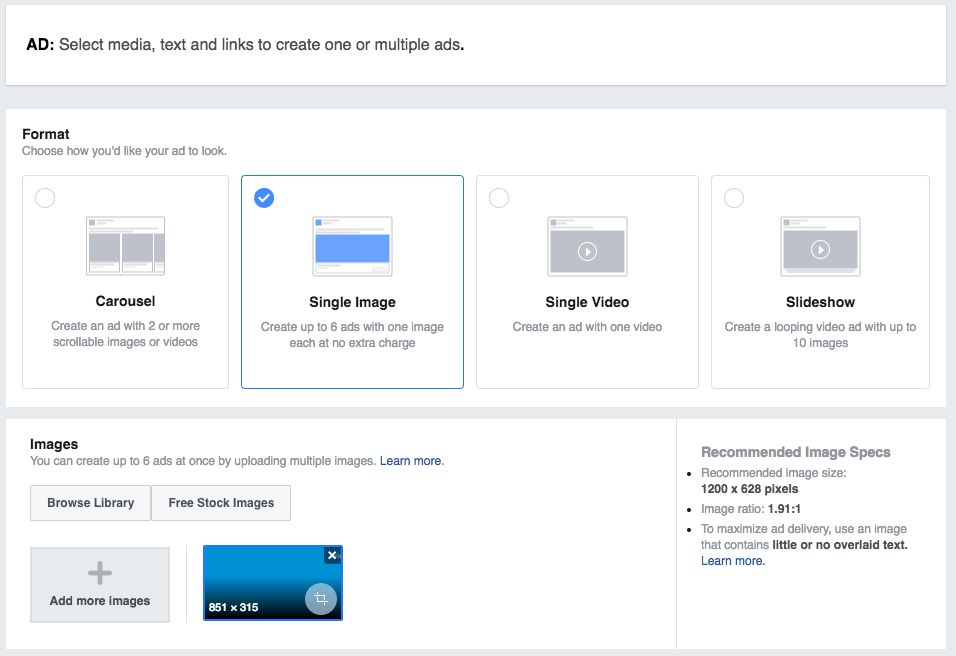
Since I haven’t produced a promotional video (yet), let’s select single image. As you gain more experience with Facebook ads you’ll be able to come back and test out different ad formats.
Next we can upload our own images or choose from Facebook’s selection of free stock images. It’s always recommended to use your own custom images. They’ll represent your brand better than generic stock photos plus give a viewer more insight into what your business actually looks like. Of course not everyone has the budget to have custom photography done, in that case it’s fine to use the free stock images.
For this example I chose a free stock photo and entered in my copy below.
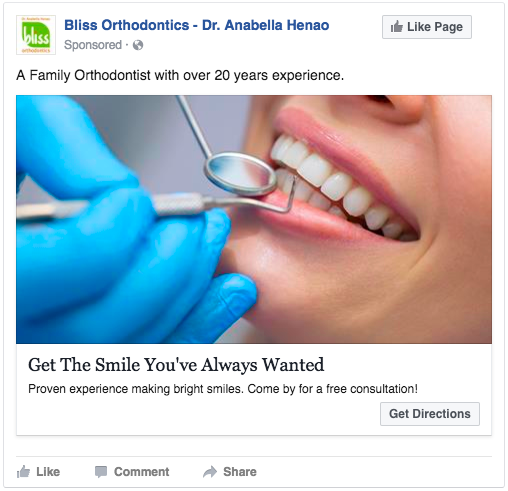
In terms of copy it’s best to keep it as short and tight as possible. Above anything, focus on the benefit you’re providing and make sure the text reflects the image you’ve chosen.
Next, enter in the destination URL you’re sending your potential customers to. Pick your call-to-action (CTA) that is inline with the goal of your ad. In our case we want to send people into our dental practice so I’ve chosen “Get Directions”. They’ll be sent to our website where they can find our contact info and contact us.
There are several alternative CTA choices, choose the one that most responds to your goal.
After I’ve selected my photo, entered my text, chosen my CTA I’m ready to see my creation.
Here’s my final product:
Analytics
After you campaign is live you’ll be able to access a full analytics dashboard to review the data.
Click on your campaign and head into your campaign dashboard. If you’d like to make changes to your ads click on the ad set then click on the ad you’d like to modify.
Your campaign dashboard should look something like this:
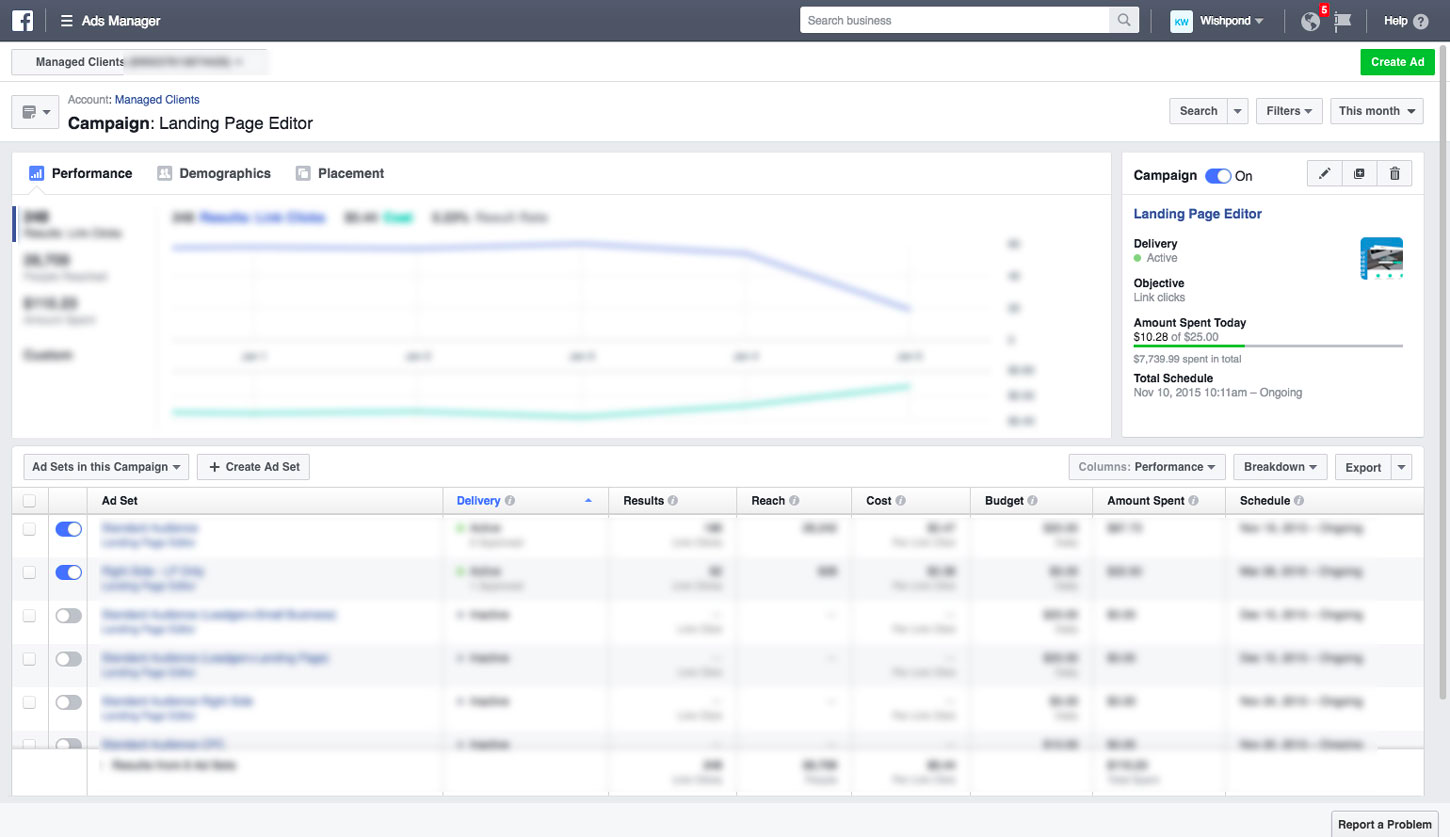
At the most basic level you can see how many people your ads are reaching, the cost per view/click, your remaining budget, and the total amount you’ve spent. There are filters in the upper right corner that allow you to change date ranges.
The blue and green graph shows your overall performance over time, along with the demographics you’re reaching and the placements that are performing best.
The data you’re receiving can give you insight into the possible optimizations you can make to improve the performance of you ads. If your placements data for example, shows that mobile users are not responding you can then eliminate your mobile ads. If a specific age group is performing better than others you can adjust the targeting to focus more on them.
Remember to give your analytics a review every once in awhile and adjust your ads accordingly. If you’d like to see an improved performance over time you must pay close attention to how your audience is receiving your ads.
Wrapping Up
The Facebook Ad platform isn’t one that can be mastered in a week or two (clearly). It’s taken many marketers years to learn how to maximize their time and returns. The only way to improve is to experiment and practice.
After you’ve published your Facebook ad campaign don’t sit back and relax just yet. There’s still optimization work to be done.
This entails…
- Testing alternative copy and images.
- Testing new CTAs.
- Testing different ad formats, like slideshows and videos.
- Adjusting your targeting. Reaching different audiences with new ads.
- Experimenting with different ad objectives.
Experiment, practice, and explore as best you can and you’ll start generating traffic in no time.
[/content-section]
[contentblock id=”backtoindex-dentists”]