The Ecommerce Guide to Online Marketing:
How to Drive Traffic, Get More Sales, and Keep your Customers Coming Back
By James Scherer
Introduction
You’ve taken the dive into selling a product online. First and foremost, congratulations.
Whether you’re just looking to make a little extra cash on the side, have committed your life savings to this endeavor, or are marketing an established ecommerce brand, selling online can be a complex and intimidating thing.
Whenever I create a piece of content, I first spend about half an hour reviewing what’s already out there.
Most “Complete Guides to Ecommerce Marketing” focus on best practices. They offer vague recommendations you’ve heard a dozen times, or offer outdated social media marketing strategies which worked in 2015, but are useless now.
I wanted this guide to be different. Firstly, I knew I wanted to offer it for free and without requiring people to give their email address to get it. You have enough going on without having to read an automated series of 20 emails I send you every day pretending to be totally personalized to get you to use our marketing tool. And anyway, our popups are free, so… yeah…
And I wanted it to be actionable. I wanted readers to be able to open the guide in one window and a piece of software or ad platform in another, and get sh*t done.
Thirdly, I wanted it to be REAL. So I created an ecommerce company. I created their homepage, figured out their target market and will be using that ecommerce business (a hypothetical company selling watches called HC & Co.) as an example – showing everything “they’d” do to create an optimized, kickass online sales funnel.
For me, best practices are crap. So this article won’t recommend any. Instead I’ll say “this is a marketing strategy I think you should try based on my own experience marketing ecommerce businesses online.”
Deal?
Let’s get started.
This guide is already free.
The whole guide is published in its entirety on this one page. If you do want to download it, though, you can do so by clicking below.
Download EbookChapter 1:
Strategies to Drive Traffic to your Website
You can have the most amazing product. You can have the most amazing website with the most amazing delivery process, customer service and all the rest.
None of it matters if nobody knows you exist.
Perhaps some of you ecommerce noobies have already noticed this?
There is one reliable way for ecommerce companies to drive traffic to their website:
Ads.
I’m sorry. That’s just the way it is. If you’re in the early stages of building a business presence online, you can mess around with blogging and social media for months (and perhaps you still will), but here’s the honest-to-goodness truth:
Unless you get very lucky, Instagram and Facebook aren’t going to drive serious traffic to your website.
Unless you work your butt off for the next year, content marketing isn’t going to drive serious traffic to your website.
Does this mean you shouldn’t have a blog or a Facebook and Instagram presence?
No. But don’t devote your life to it. And both still have their uses. Creating a subscriber list and a newsletter is worth doing, and that’s easier if you’re writing some content. And social media is a great place to increase brand awareness and (even) drive traffic with contests.
But putting hours of your day into crafting amazing social media posts is a wasted effort, and won’t drive sales.
There, I said it.
So let’s get into the two platforms which can drive reliable, measurable, profitable traffic to your website…
Google Advertising
Google Adwords is a platform built around search ads and display ads.
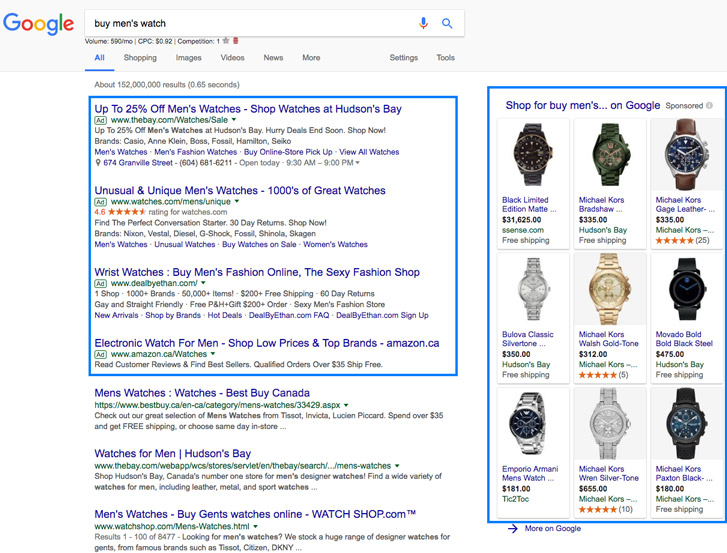
Search ads work by triggering your ecommerce company’s advertisement whenever someone searches for your selected keywords or phrases. For HC & Co (the hypothetical ecommerce company I made for the purposes of this guide), this is what I’d be competing with:
The coolest part of both Google Adwords and Facebook Advertising is that both platforms offer analytics tools which offer recommendations, analysis and easy-to-understand takeaways if I’m spending too much money on one keyword or audience and should move my ad budget around. And once I’ve set up a simple bit of tracking code within my website, they also enable me to quickly and easily see how profitable my ad campaigns are.
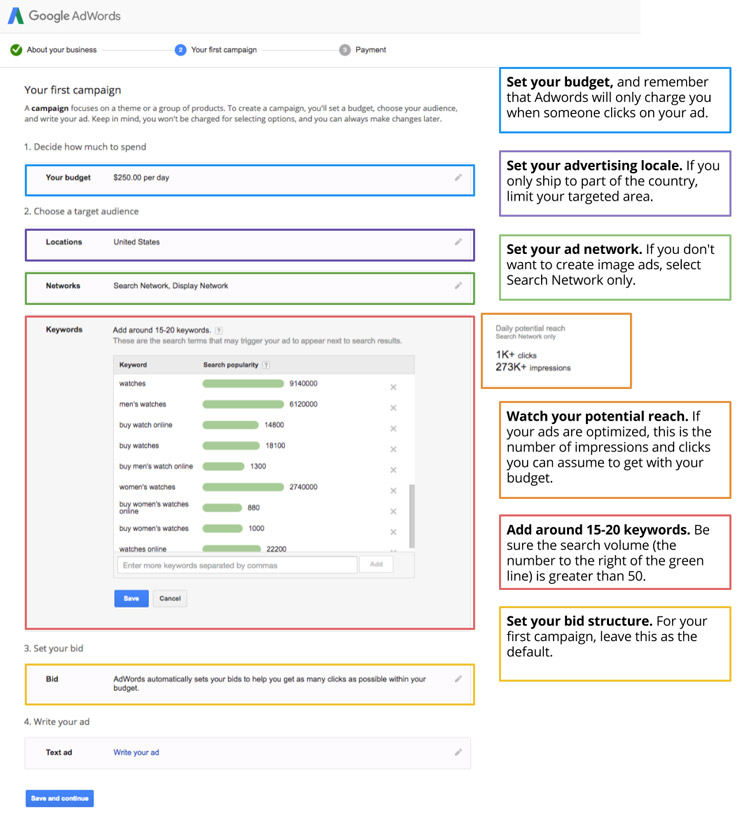
Here’s a walkthrough of how to create your first Google Adwords campaign to drive traffic to your ecommerce website:
Step 1: Go to https://adwords.google.com and follow their setup process (or call the number and arrange a time to get set up).
Step 2: Create your campaign
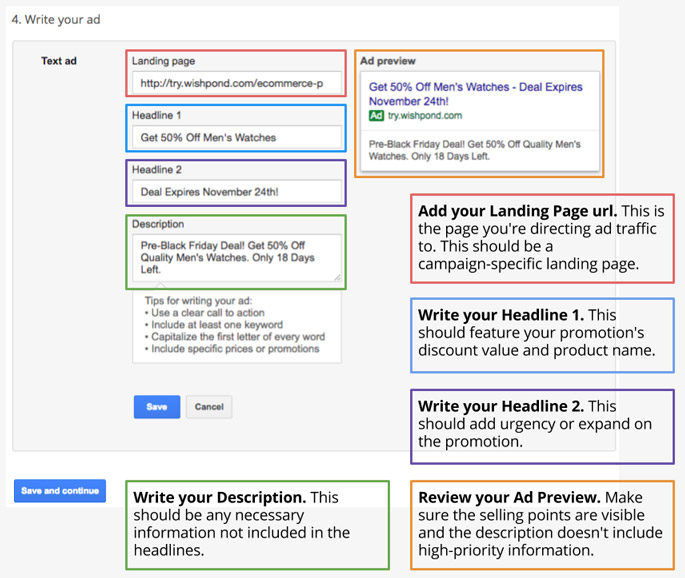
Step 3: Write your ad
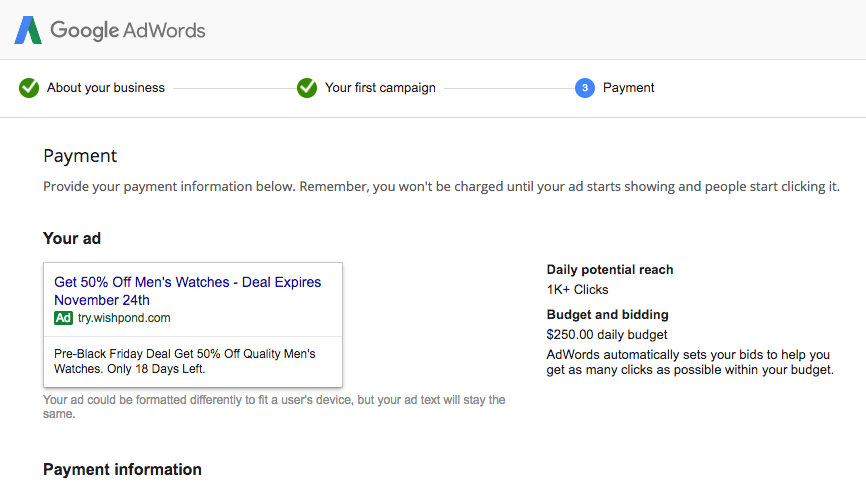
Step 4: Set up payment
Step 5: Finish and create your ad
Bonus Step: To add the Google Adwords Conversion Tracking Pixel to your Shopify site, follow their walkthrough here, or hire someone from Shopify to do it for you ($40).
Remember, there’s a lot more out there than what I’ve shown here, but giving it all to you in one fell swoop (alongside everything else in this guide) would overwhelm you. Shopify has a great Adwords walkthrough if you want to jump into the advanced stuff once you’re done here.
You good to move on for now, though?
Facebook Advertising
Unlike Google, Facebook Ads are targeted at specific individuals, rather than a search term. This means that the people who see your ecommerce ads aren’t necessarily looking for the thing you’re advertising.
This results in a significantly lower click-through rate, but (equally) a significantly lower cost-per-click.
Where an ecommerce business selling watches might pay 3-5 dollars per click on Google Adwords, a well-targeted Facebook Ad should only cost about .50 – 1 dollar.
Here’s a step-by-step walkthrough to getting started with your first Facebook ad:
Step 1: Create your Facebook Business Manager account and go to Ad Manager
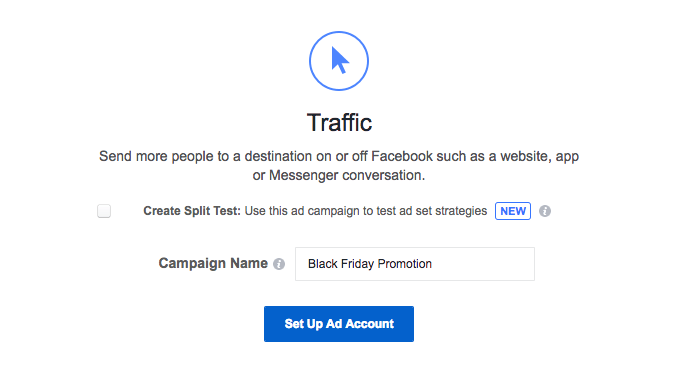
Step 2: Choose your Campaign Goal
Step 3: Determine your Target Audience
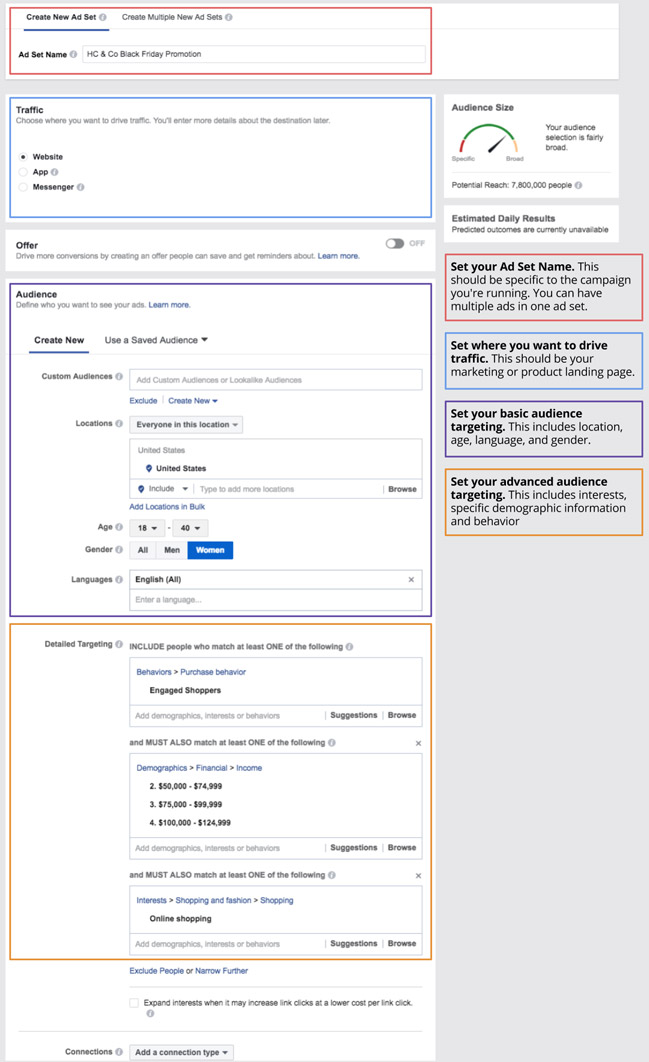
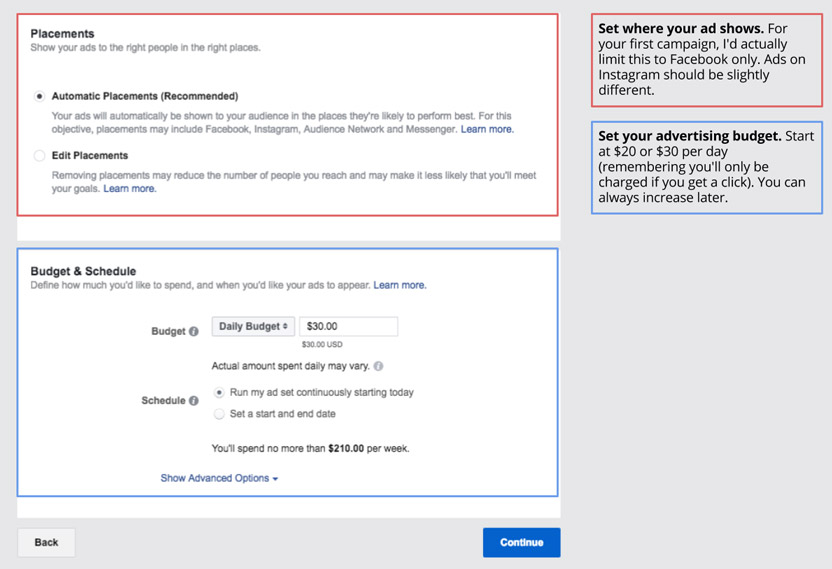
Step 4: Set your Facebook Ad’s Placement and Budget
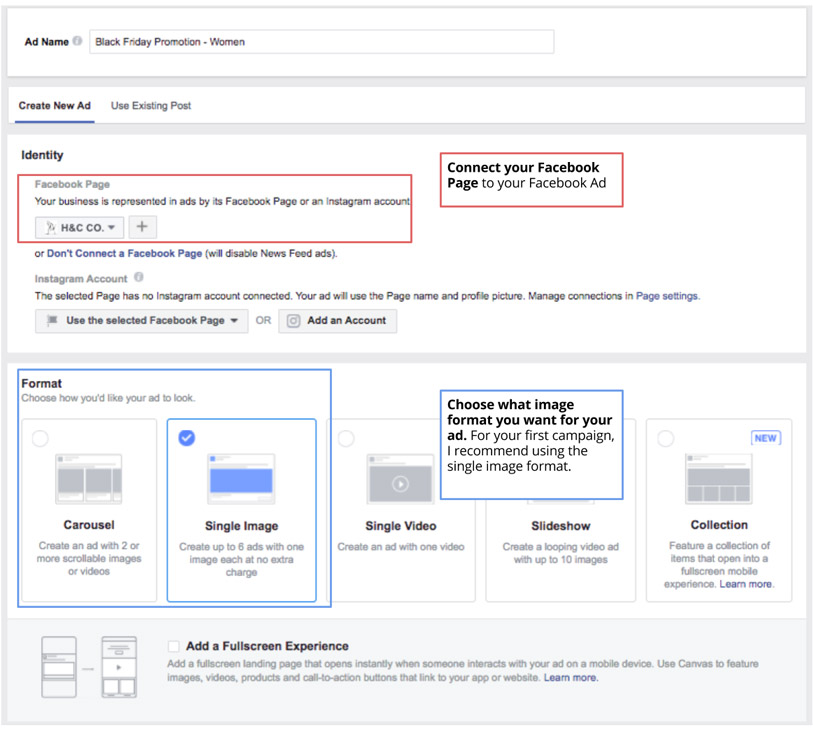
Step 5: Connect your Facebook Page and Determine your Image Format
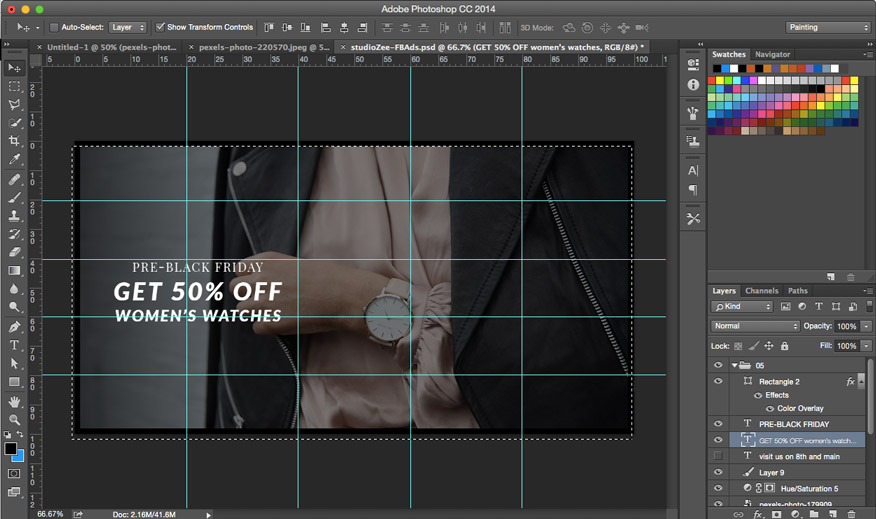
Step 6: Create your Facebook Ad’s Image
Step 7: Write your Facebook Ad’s Copy
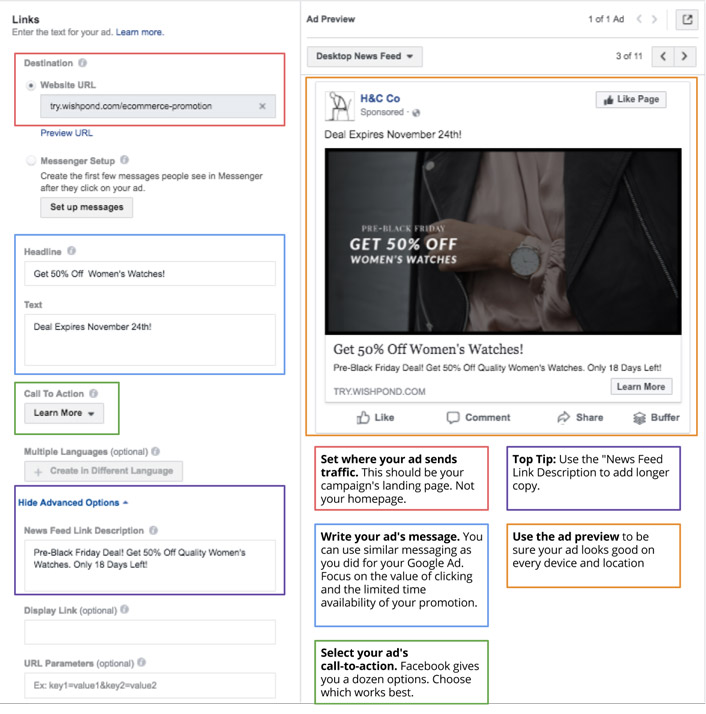
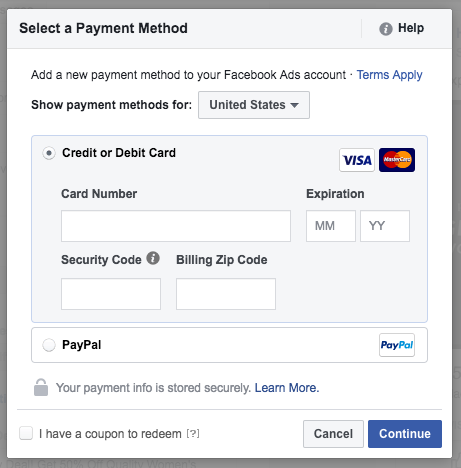
Step 8: Set up Payment and Launch your Facebook Ad!
Bonus Step: To add the Facebook Tracking Pixel to your Shopify site, follow their walkthrough here or hire someone from Shopify to do it for you ($40).
I put together a complete guide to Facebook Ads last year, and if you want to learn (literally) everything there is to know – from budgeting to advanced targeting, custom audience creation and all the rest – check out The Comprehensive Guide to Facebook Ads. That one’s also free and doesn’t require an email address.
Chapter 2:
How to Increase Website Conversions
Now that you’re driving reliable traffic with Google Adwords and Facebook Advertising, we need to take a look at your website.
Website Optimization Strategies
First and foremost, I want you to start thinking about your website in a totally new way:
An optimized website is less a collection of everything you sell (and why people should buy it) and more a series of interconnected, but largely independent, campaigns.
Let me explain.
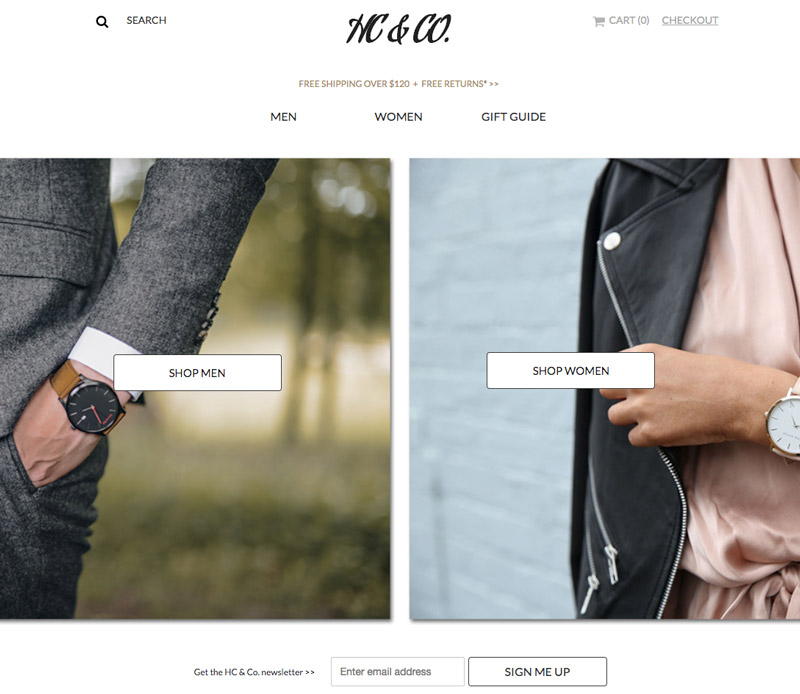
If you’re like most ecommerce websites, you expect people to arrive at your homepage, and then find their own path to the product they want.
Your homepage looks something similar to the one below, where it’s mostly about choosing your path from the options given:
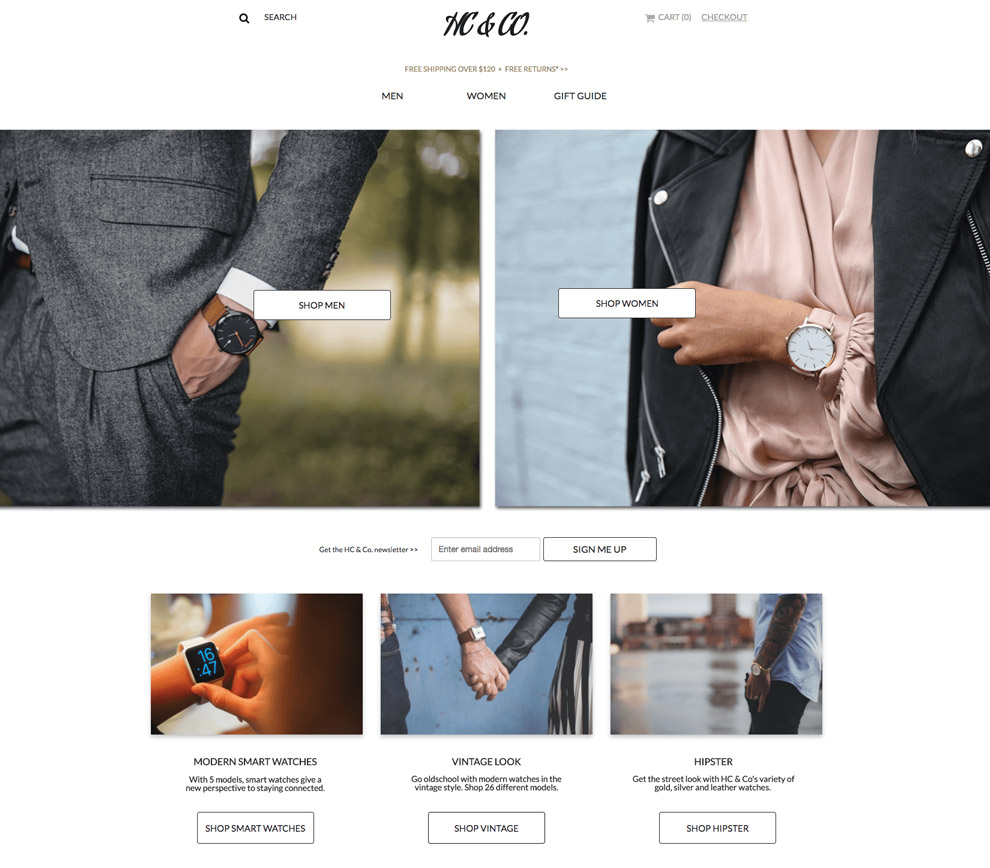
And this is all well and good. But your homepage should be the only page of your website where you give people this many options.
Instead, you should be considering each page of your website as being created to target a specific audience, a specific marketing campaign.
Think about it: where are you getting traffic from?
- If you’re running a Google ad campaign, you should have a specific value proposition for that campaign. As a result, the page that the ad sends people to should speak specifically to that value proposition.
- If you’re running a Facebook ad campaign, you should be targeting specific elements of your general audience differently (an ad targeted at women should feature a woman model, for instance). You should, therefore, drive people to a landing page which is built around women-centric products and selling points.
- If you’re running a product-focused social media campaign on Instagram, you should send people to a page featuring the products in the image. If you “sell” someone on social media with a specific product, enough that they’ll click through, and then they arrive on a general product directory, you’re far more likely to lose them than if you send them to a product page featuring what they saw.
A rule of thumb for website optimization: Don’t just go to your homepage and follow a path, looking for holes or obstacles to a paid conversion. Instead, take the perspective of a specific individual…
- How did they find your site?
- What are they looking for?
- What page are they arriving on?
- Is there a better way for you to present them with what they’re looking for?
Only once you’ve optimized their specific sales funnel, can you start thinking about questions like “Am I presenting all the information they need in a palatable way?” and “What pain points does this person have, and do my sales pages address them?”
For more on this subject, check out “Homepages are Dead: The Rise of The All Landing Page Website.”
Website Popups
As soon as someone arrives on your website, from any source, you want to be influencing their experience.
What do they see first? Is it relevant to who they are and what they’re there for?
Or, more importantly, “Can you, above and beyond the way your website is already optimized, impact their likelihood of making a paid conversion?”
The answer is yes, if you utilize website popups intelligently.
I’m going to recommend three types of popups to help your ecommerce website convert a great percentage of its visitors:
#1. An entry popup, giving new customers a discount if they subscribe.
An entry popup, with discount, frames your visitor’s entire experience of your website. They’re now viewing your products and product pages with the pre-existing discount in their head: “I get to take 10% off everything I’m seeing, here.” That change in perspective influences their decision to buy, even if the price points they’re seeing are actually more than they were expecting.
#2. An exit popup, opening only if people have added something to their cart:
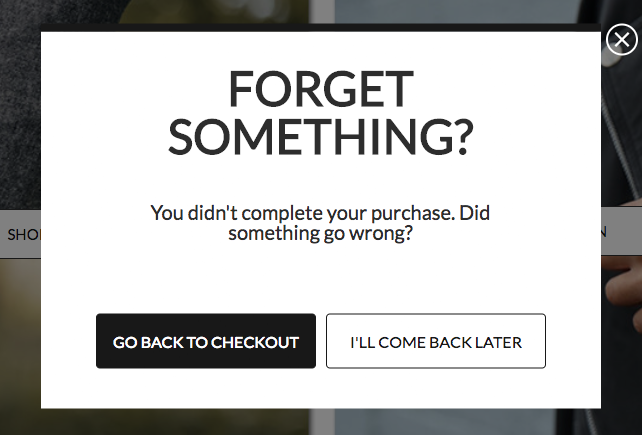
You can offer an added discount or free shipping to this popup (or optimize it in any number of other ways), but the important thing is simply to make your prospective customers stop for a second. Closing a tab is easy, but actively selecting “No, I don’t want to buy,” is a far more difficult decision to make.
I’ve never actually tried it, but using “I’ll come back later” could actually impact people’s decision to come back later. Who knows? Give it a shot!
#3. A scroll popup, showing on your homepage to notify people of a limited-time sale:
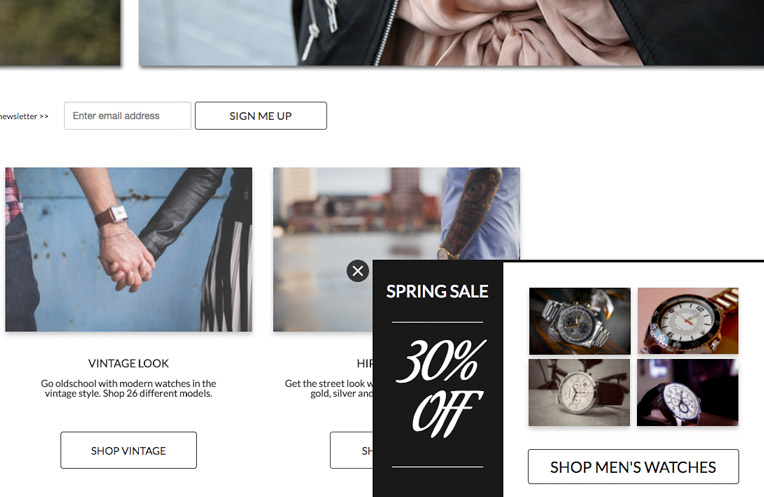
Scroll popups are a great way to feature something you want people to know about, putting it front and center so they can’t ignore it.
Another option would be an opt-in bar, which appears at the top or bottom of a page and (like a scroll popup) still allows people to interact and scroll on the page they’re on (other popup types don’t).
To start adding website popups to your ecommerce website and converting more of your traffic, try Wishpond’s builder, totally free.
Campaign-Specific Landing Pages
I mentioned the need for campaign-specific landing page in the website optimization section above.
Essentially, it’s about focusing your visitors on the thing they’re interested in, and limiting distractions.
If I send my Facebook audience of men – guys who have clicked on an ad promoting 20% off a specific watch – straight to my main product directory, where they have to segment themselves (again) I’ll lose a few of them simply on the first page.
If I, instead, send them to a page dedicated to the product and promotion they were interested in, I have a far higher chance of converting them.
For instance:
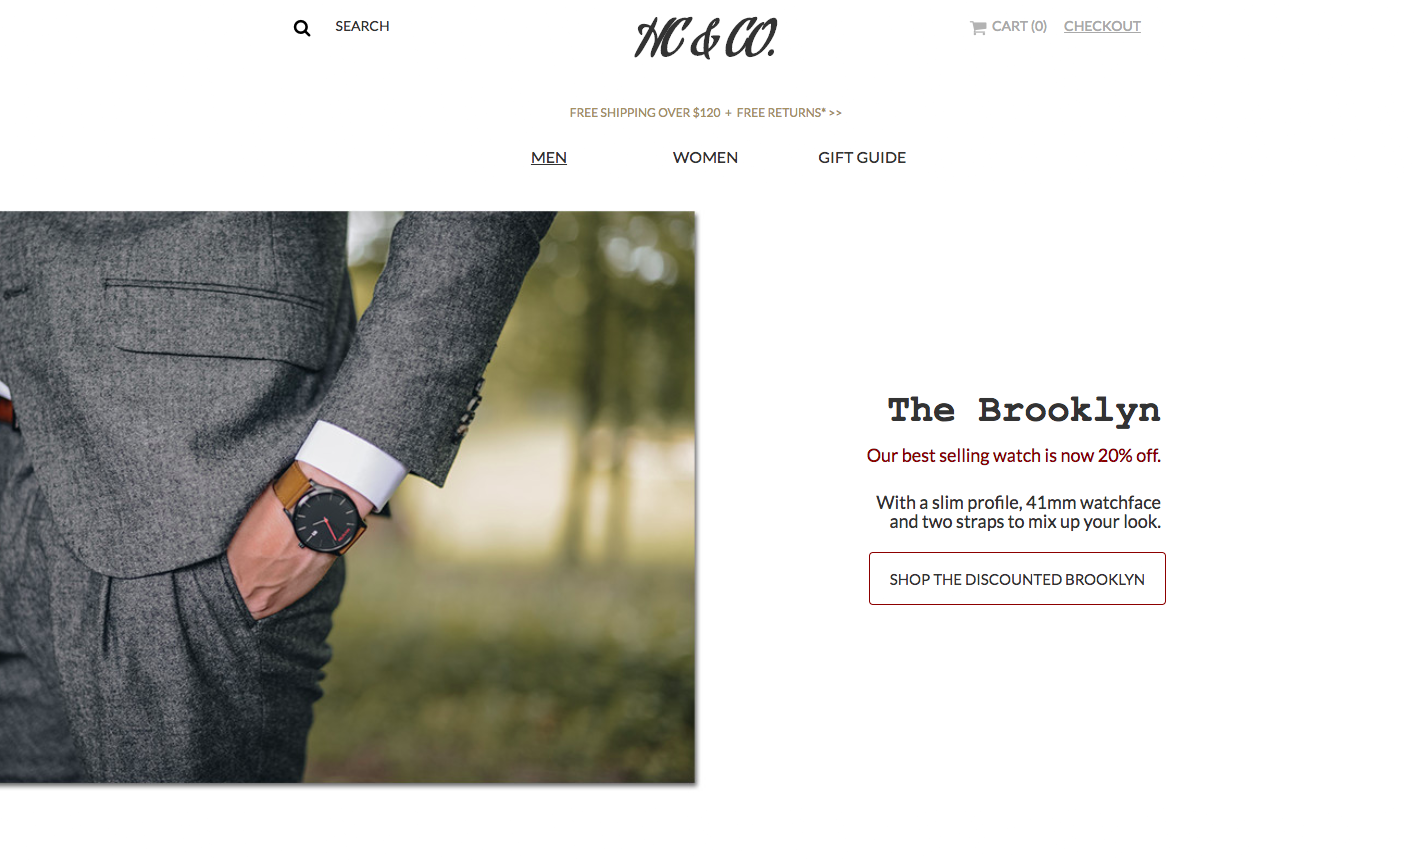
What’s great about this landing page:
- Contrasting color. Especially on website like HC & Co’s, which is very black and white, very modern, and very clean, any color stands out intensely. It draws the eye to the focus of the page.
- The same image as the advertisement which drove people here. Consistency is key when you’re optimizing your ad campaign funnels. Arriving and seeing exactly the same image that you saw in the ad ensures visitors know they’re in the right place.
- Value featured clearly. If you’re running a discount or promotion, put the percentage off or dollar value front and center.
- Limited external links. Though this page has retained the top navigation, there’s nothing there which, realistically, my visitor would click. Many landing page purists would recommend you remove all non-campaign links. For a campaign like this one, though, I think that might simply intimidate your visitors. Leave the nav, but remove anything which could draw them away from your conversion objective.
For more on optimizing your ecommerce landing pages, check out the B2C examples within “17 Landing Page Examples Reviewed with A/B Testing Ideas“.
Increase Sales through Contests and Promotions
I love marketing ecommerce companies, and there’s two reasons why:
First, your products are beautiful. And believe me, a pretty product is way easier to sell than some ephemeral software which exists, really, only on our servers and the cloud.
Secondly, you can tap the power of holidays, seasons and current events to run contests and promotions. And believe me, it’s hard to sell “Get 20% off your first month of Wishpond’s marketing campaign software, because it’s Halloween!”
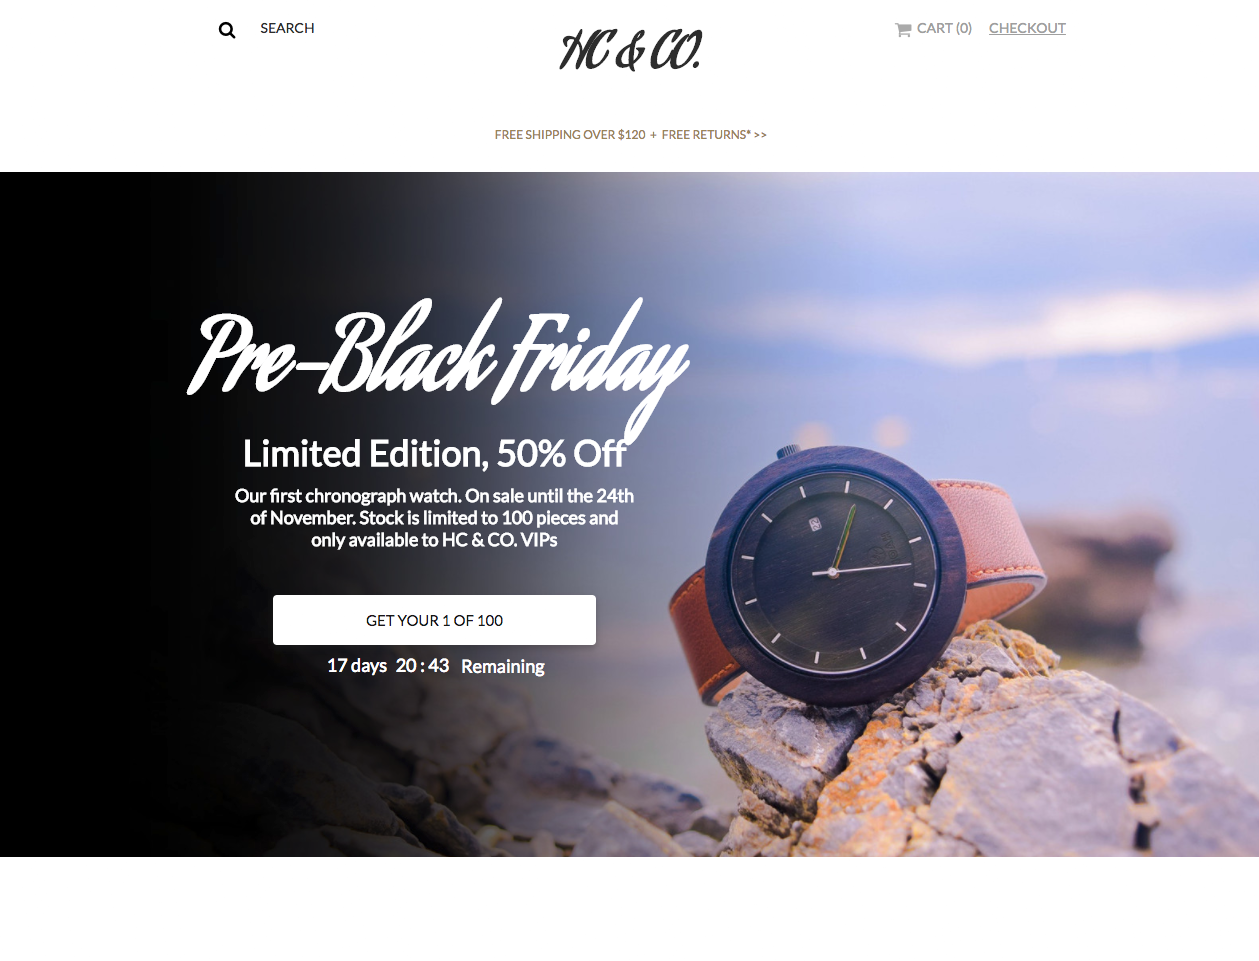
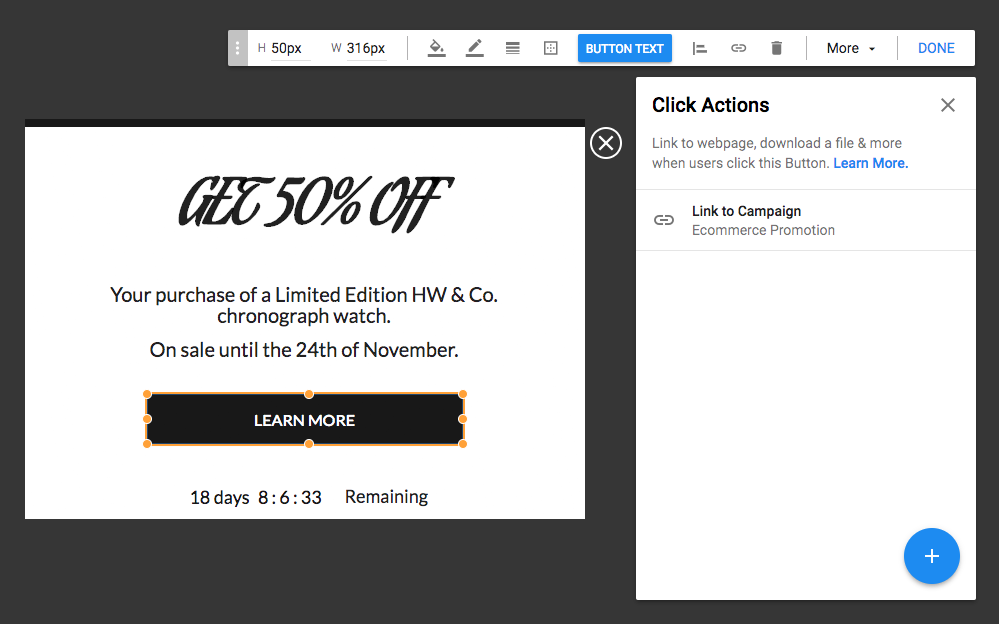
For instance, you could run a “Pre-Black Friday” promotion, giving 50% off one of your most overstocked products:
Or you could run a “Pre-Black Friday” contest, giving away 10 of those same overstocked watches, and then generate hundreds of new prospective customers who you can convert down the line using email:
To drive traffic to either type of seasonal ecommerce promotion, you need to have both a Facebook Ad strategy (not Google Ads, as the return on investment won’t be positive) and an organic strategy.
The Facebook Ad walkthrough I gave you above is actually for a promotion, so following that would be a great place to start.
For your organic strategy, there’s three main steps:
Your Newsletter:
Send a newsletter to your existing email list. Something like this:
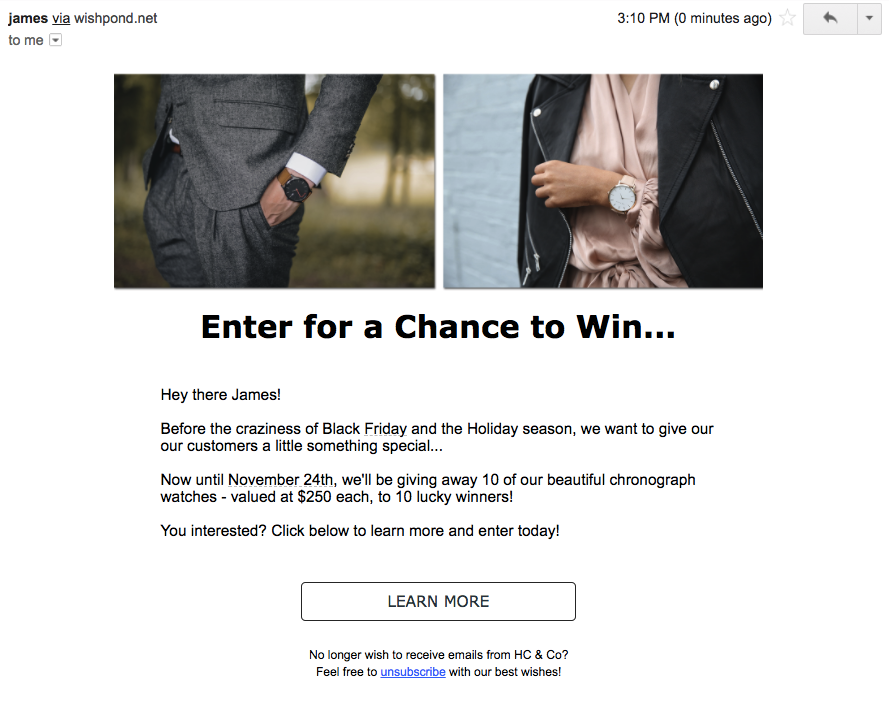
The value of a newsletter is truly realized when you use Bonus Entry Incentives to encourage your entrants to share your contest with their own networks to get additional chances to win.
For more on bonus entry campaigns, check out Wishpond’s Referral Suite.
Social Media Posts:
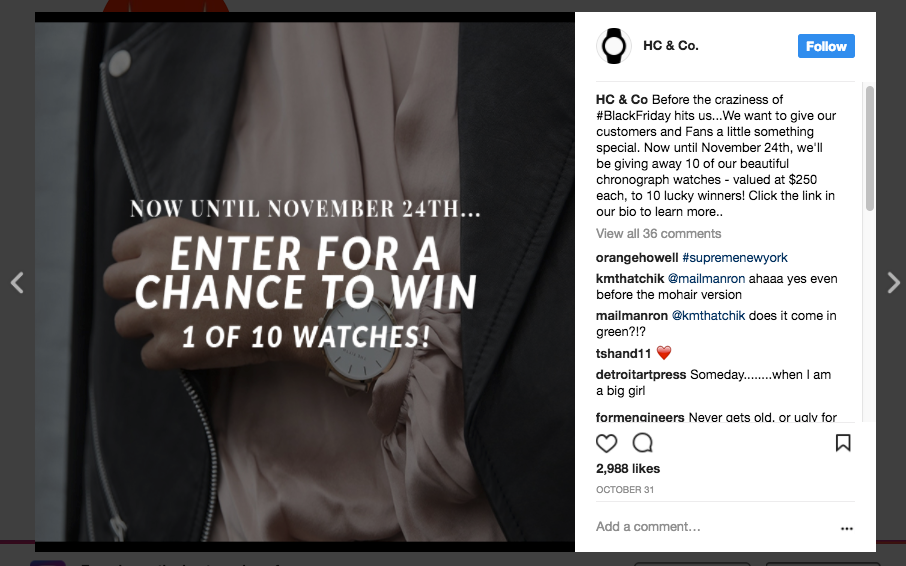
Send out a few social media posts. Something like this:
Traffic from your Website:
Your website already gets a bunch of traffic organically (especially your homepage).
A super easy way to drive awareness of, and traffic to, your lead generating contest or promotion is to send it from your high-traffic pages.
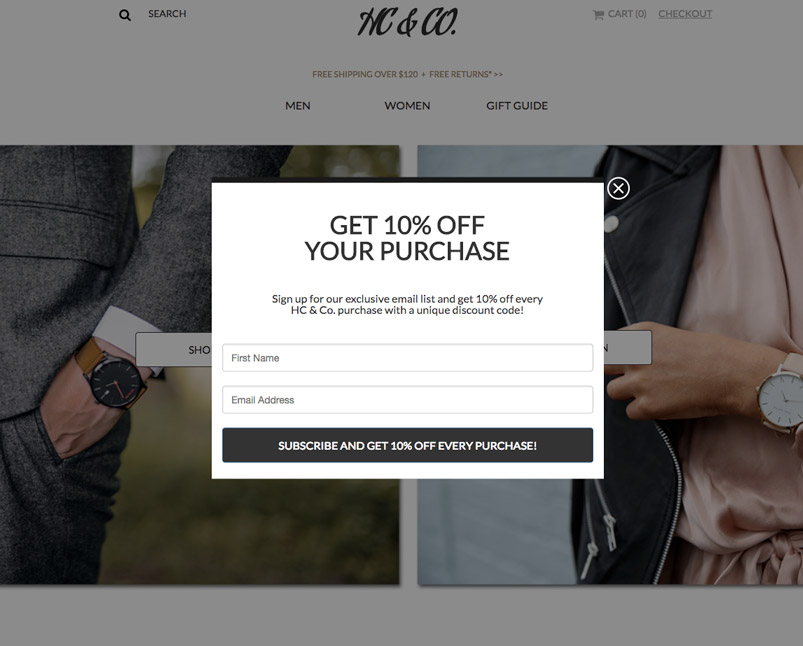
My recommendation is to create an entry popup, which shows as soon as someone arrives on your website, and send people from it to your promotion page.
Here’s what would happen when you arrived on the HC & Co. website:
Chapter 3:
How to Get Visitors to Come Back
So, we’ve effectively driven traffic to a website which has been optimized for conversion. Awesome.
Unfortunately, no matter what we do, we’ll still lose far more than three quarters of them.
That’s just the way it is. The best ecommerce website, collecting the most qualified and interested traffic imaginable will still have a 90% bounce rate (people who arrive on the website and then leave without converting).
There are, however, a couple things we can do.
First and foremost. This is why it’s important for you to have those “Get 10% off if you subscribe” popups or run a social media campaign which generates leads.
Without collecting the contact information of your prospective customers, there’s only one option to drive them back to your website (and I’ll get to that below).
With their contact information? Oh, the world is our oyster.
Reader, meet marketing automation…
First, there’s the “Abandoned Cart” email:
Provided you’ve added the Wishpond tracking pixel to your website (or the pixel for whatever marketing automation platform you’re using) you can track the page visits and behavior of your website visitors.
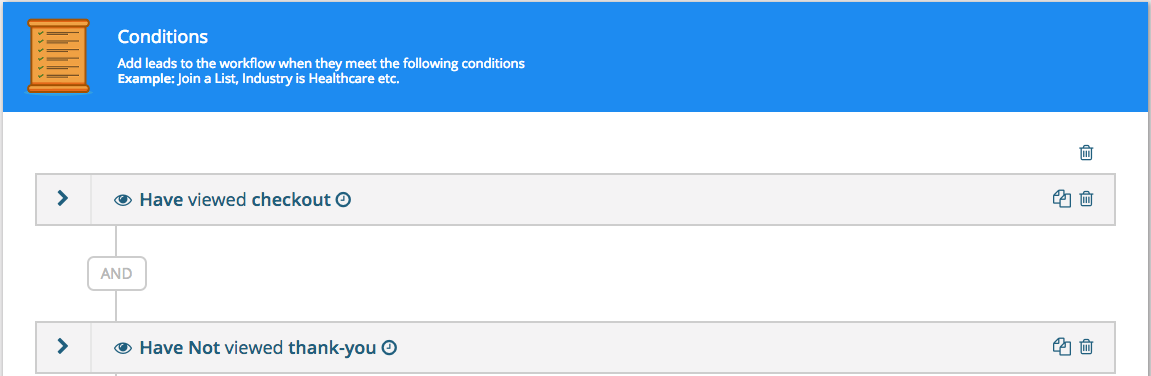
The abandoned cart email is triggered to send, automatically, when a website visitor (whose email address you have) visits your checkout page but not your thank you page.
The conditions look like this:
And the actions (which trigger when the conditions are met):
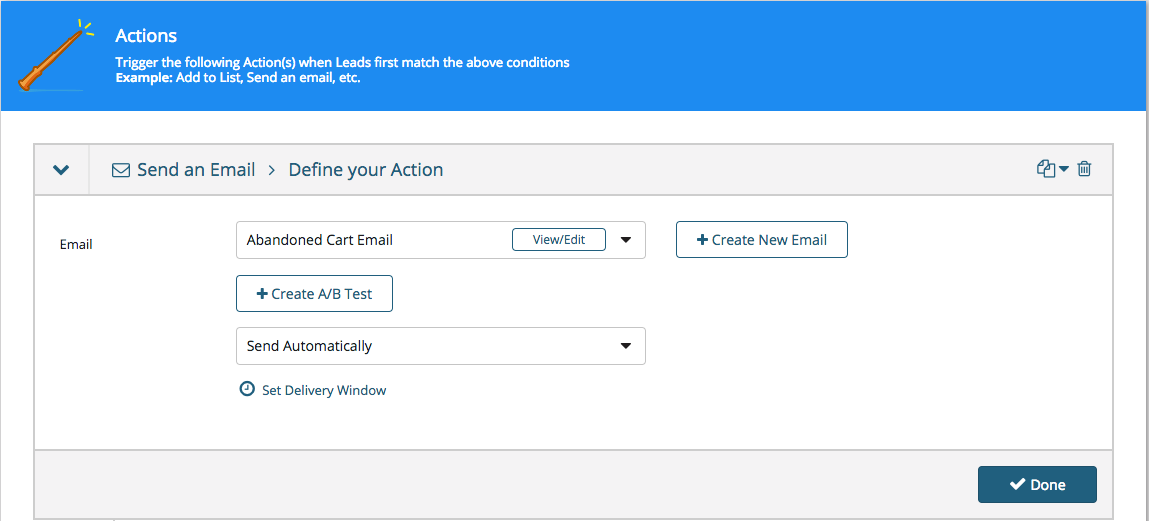
Second, there’s the “Visited but Didn’t Buy” email drip campaign. The conditions would be the same, but the actions would be slightly different:
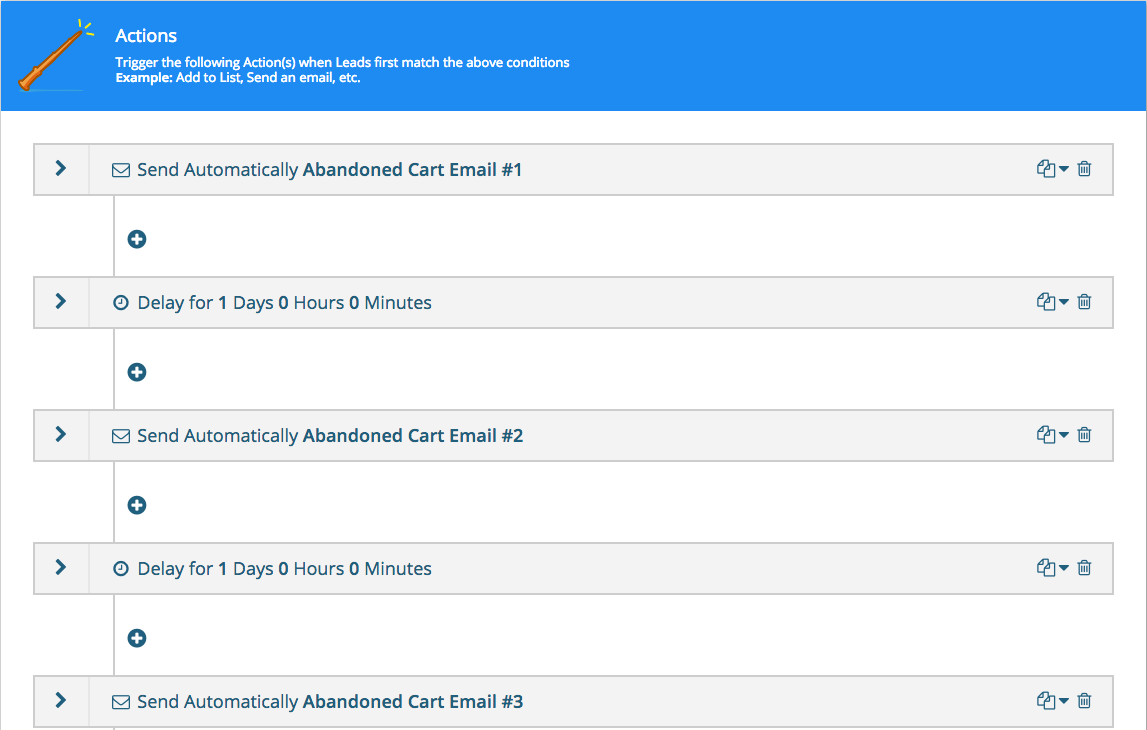
The emails to include in your abandoned cart drip campaign:
- The first email should be a very simple one, essentially just “You’ve left something in your cart! Did something go wrong on our end?” and then an (optional) additional discount, such as free shipping or discount code.
- The second email should be one of two things: either a reframing of your value proposition (“this product is unique or amazing in this particular way”) or an additional value-add (“We’re happy to offer free-shipping on all first-time purchases for the next 48 hours”).
- The third email is your “last-ditch” email, in which you reiterate the value or emphasize the limited-time element of your additional promotion.
Top Tip: Be sure you’re removing leads from your automated workflow when they buy. In Wishpond, this is a simple matter of selecting “Remove Leads from this workflow if they no longer meet these conditions.” You don’t want to continue to send follow-up emails to customers who did, in the end, complete their purchase.
Retargeting
Retargeting (or “remarketing” on the Google Adwords platform) is an advertising strategy in which you show paid ads exclusively to people who have visited your website and left before completing a desired conversion.
You show your ads, which remind people of the value of your product, how pretty it is, or that they can get 20% off if they purchase by midnight tonight, and they’re driven back to your sales pages.
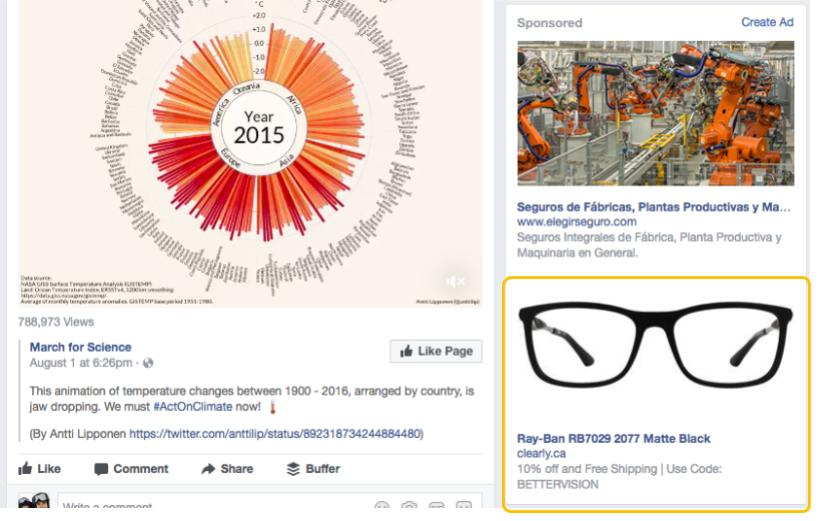
For instance, say I went to Clearly Eyewear’s website and put a pair of glasses into my shopping cart, but then left before I could buy them.
Retargeting enables Clearly to retarget me on Facebook immediately:
While retargeting isn’t going to drive 100% of your bounced traffic back to your website to buy, it’s substantially better than losing all of them to the internet abyss.
So let’s dive in. There are two primary remarketing platforms: Google and Facebook…
1. Google Remarketing
If you’ve set up your Google analytics tracking pixel correctly, you’re already halfway there.
Here’s the step-by-step process (copied directly from Google):
- Sign in to AdWords.
- Click Campaigns.
- Click +Campaign and select “Display Network only.”
- Leave the “Marketing objectives” option selected and check “Buy on your website.”
- Choose a campaign name, bid strategy, and budget.
- Click Save and continue.
- Enter an ad group name and bid.
- Under “Choose how to target your ads”, click Interests and remarketing.
- In the “Select a category” drop-down menu, choose Remarketing lists.
- Click Set up remarketing to begin the 2-step process for creating your remarketing tag and lists:
- Step 1: If you use Google Analytics, you’ll see a checkbox to use the tracking code that’s already on your website instead.
- Step 2: AdWords will create an “All visitors” list to get you started, so you don’t need to create this list yourself. The “All visitors” list includes everyone who has visited tagged pages on your website. You can later create new lists for your different groups of website visitors.
- Enter an ad group name and bid.
- On the Remarketing lists tab, you’ll find the “All visitors” list added to your ad group.
- Click Save and continue if you want to create your ads.
2. Facebook Retargeting
For Facebook, be sure you’ve installed the Facebook Pixel within your website (you’ll need to in order to track conversions from your ads anyway).
There’s a couple options: one, which is complicated and 100% foolproof, and a second one, which is far simpler but more likely to target people who may have already bought.
The first way is to follow a somewhat complicated setup from Facebook which involves triggering custom events when your website visitors click “add to cart” and another one when a “purchase completed” event is fired. You’ll need to add pieces of code to the Facebook pixel they provided initially. Uhuru has a good walkthrough, and the code additions are in the Facebook developer library.
The second way is to use website custom audiences, which is based on pageview (or URL).
It’s pretty straightforward.
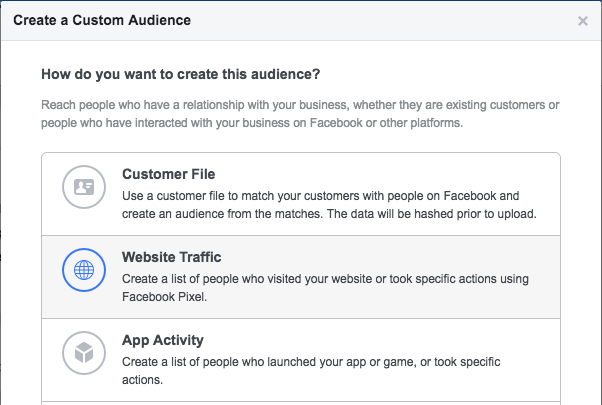
When you’re setting your target audience for your Facebook Ad (I’d create a retargeting ad set, by the way), select “Custom Audience,” and then select “Website Traffic:”
Next, create your audience. Include people who have visited your Checkout page (in which URL contains “checkout” or the equivalent). Then, exclude people who have visited your Thank You page (in which URL contains “thank-you” or equivalent):
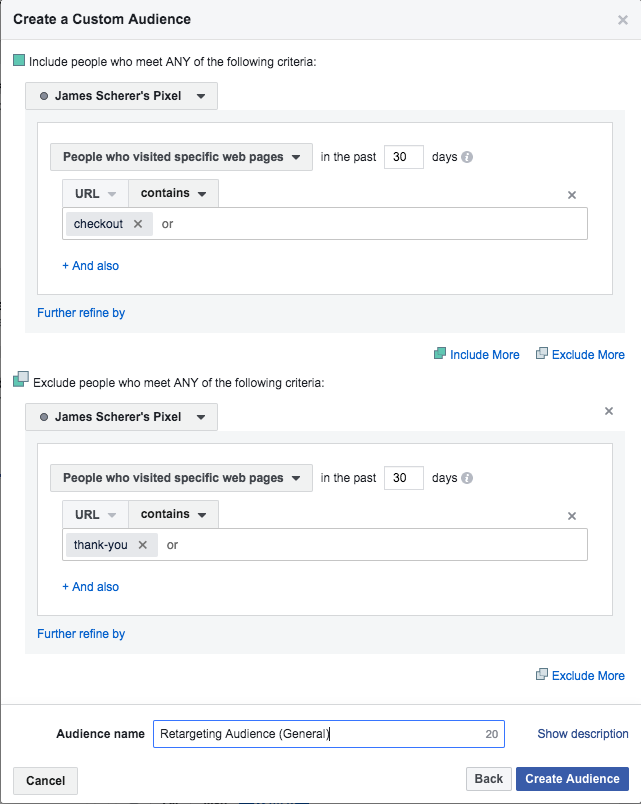
This will, effectively, create a custom audience of website visitors who have added something to your shopping cart and started the checkout process, but left before completing it.
Creating more complicated URL-based custom audiences will make your ads more effective. For instance, if URL =”www.hcandco.com/men/fall-line/checkout” you could retarget exclusively your male visitors who wanted to buy a watch within your fall line, but didn’t complete the purchase.
Chapter 4:
7 Ecommerce Hacks
That’s pretty much it. You’ve successfully driven traffic to a website optimized to receive it. Then, you addressed (as much as we possibly can) the holes in our sales funnel, and taken step to close them.
Now, it’s all about those little tweaks which you can test and implement over the next few months (once you’ve gotten the rest of it sorted out).
Let’s call these the “7 Ecommerce Hacks you Can’t Live Without” or something equally click-baity…
1. Create Urgency
Every promotion you run should be available for a limited time or “Until supplies run out!”
Do you think that your customers don’t buy because they don’t want your product, or because of the price?
Possibly, sure.
But a major reason has nothing to do with the practical side of consumer behavior: people are lazy. They just can’t be bothered.
So you need to give them a push. You need to give them a little “if you don’t, you’ll lose out forever.”
- Why do you think that every airplane seat you want to buy is one of only three left?
- Why do you think that every car dealership can only hold onto their given quote for another few hours?
For more on using urgency on your ecommerce website, check out Wishpond’s guide to urgency at “5 Ways You Can Create Urgency on Your Website” or Shopify’s “While Supplies Last: How to Use Scarcity and Urgency to Increase Sales.”
2. Offer Live Chat
It’s common sense that people would be more likely to buy if they don’t have to go searching through your website to find the answers to their questions. If they can, instead, just click a little button on the bottom right of your website and ask a representative?
No brainer.
Even so, let’s check a few statistics:
- 44% of online buyers say that getting their questions answered by a live representative is one of the most important features a website can offer in the buying process.
- 47% of online shoppers are more likely to make a purchase if they can talk to a live representative.
- Online buyers who had used live chat were more likely to make online purchases at least once a week (40%) than buyers who had never chatted (22%).
- 63% of respondents who chatted said they were more likely to return to an ecommerce site, and 62% reported being more likely to purchase from the site again.
Sources: eMarketer, Tagove and Forrester
For more on this, check out “How Our Support Team Maximizes Customer Success with Intelligent Automation.”
3. Use Welcome Mats and Exit Popups to Drive Subscribers
I’ve been over this a bit before, but popups are a powerful way for you to put value or information in front of your prospective customers – a way to frame their experience.
A welcome mat can notify your website visitors of a current promotion you’re running, or discount you offer to first-time visitors. While an exit popup can recapture those prospective customers about to leave, notify them of a discount they didn’t know existed, or a reason to buy they hadn’t thought of.
For instance:
For more on using welcome mats and exit popups on your ecommerce website, try Wishpond’s free popup tool (which allows you to add 8 different types of popup to your website in minutes).
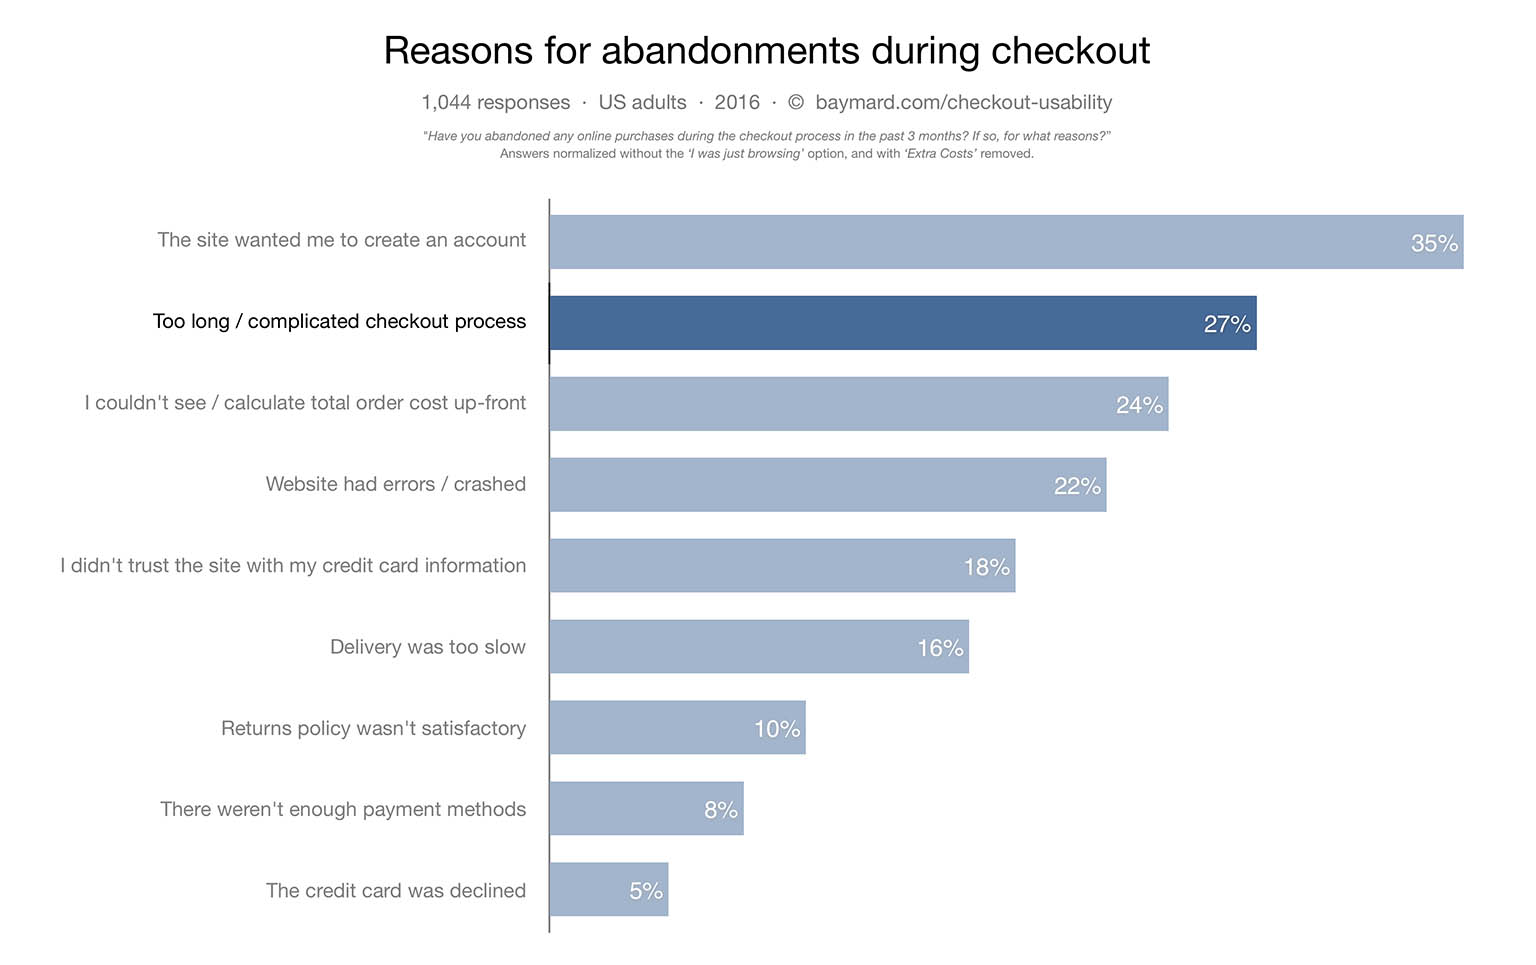
4. Optimize your Checkout Process
At least 27% of cart abandonments are caused by a complicated checkout process:
A few strategies to fix it:
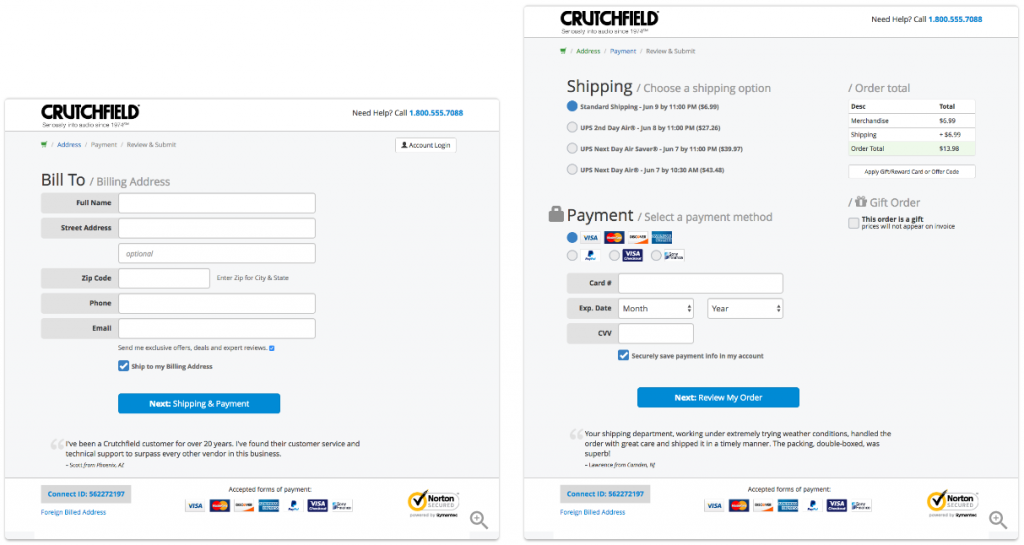
- Limit your checkout form fields. Where possible, collapse all optional fields like “Address 2.” Have a customer’s full name in only one field.
- Limit your non-checkout information. Any information not related to the checkout process should be removed from the page.
- Separate your buyer information forms from your mailing address forms. Make them two different steps, if possible).
- By default, have shipping information prepopulate with billing information (collapsed).
A great example of a two-page checkout process with minimum fields:
For more on using trust symbols on your product pages, check out “How to Use Trust Psychology to Improve Sales Page Performance.”
5. Sell from Instagram
Instagram monetization tools (Have2HaveIt, Like2Buy, etc) enable your customers to “shop” the items in your Instagram posts by clicking a link in your bio.
Essentially, whenever you schedule an Instagram post, you tell the tool which of your products are going to be featured.
The tool then, automatically, creates a sales page for those products within a independent page of your website.
It’s easier if I just show you…
Let’s say I went to David’s Tea (a high-end tea company in Canada) and clicked on the link in their bio, as their post had prompted me:
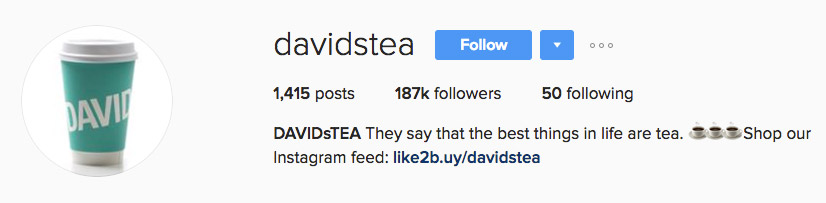
That link sends me to a “David’s Tea”-specific landing page, featuring thumbnails of their posts…
For more on this, check out “How to Create an Instagram Marketing Strategy in 2017” and “15 Powerful Instagram Marketing Secrets You’ll Want to Steal.”
6. Get Testimonials and Reviews
Your customers don’t trust you.
After all, when it comes to your own products, you’re a bit of a biased source of information. You do, after all, have a vested interest…
Customer testimonials and reviews, however, are different. For a few reasons:
- They feature real and relatable people, increasing the personality of your page
- They feature people similar to your website traffic, increasing the chance of that traffic trusting the rest of your message
- They can showcase specific value points of your product or service you may not otherwise mention
- They can be specific, offering almost case-study-like metrics, KPI’s and analytics in real-world and concrete terms (“We increased our site traffic by 74% in three weeks and had an overall ROI of 522%. Awesome!”)
For more on this, check out “Landing Page Customer Reviews: The How the What and the Wherefore.”
7. Drive Repeat Customers with Segmentation
Want to know the fastest way to have your customers devalue your mailouts, unsubscribe, or mark you as Spam?
Send them content, promotions, and information which doesn’t relate to who they are and what they want.
The best way to create a loyal customer is to personalize your communication. For that, segmentation is key.
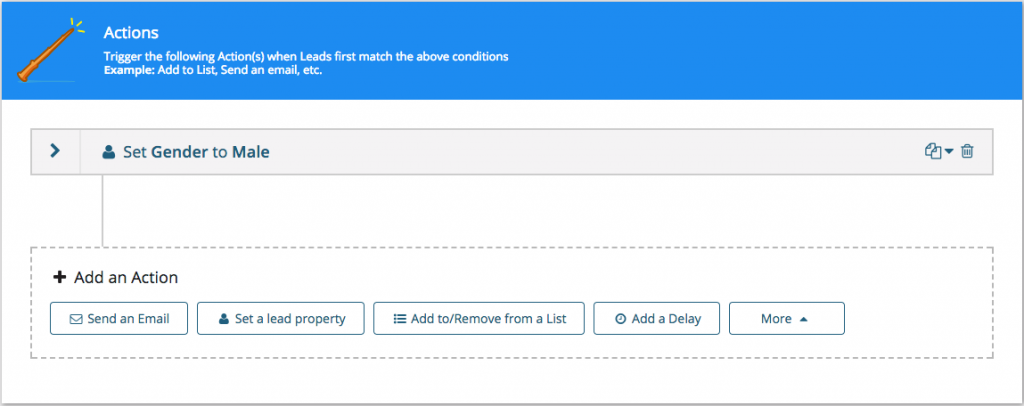
Step 1: Set the conditions of your new Lead Property:
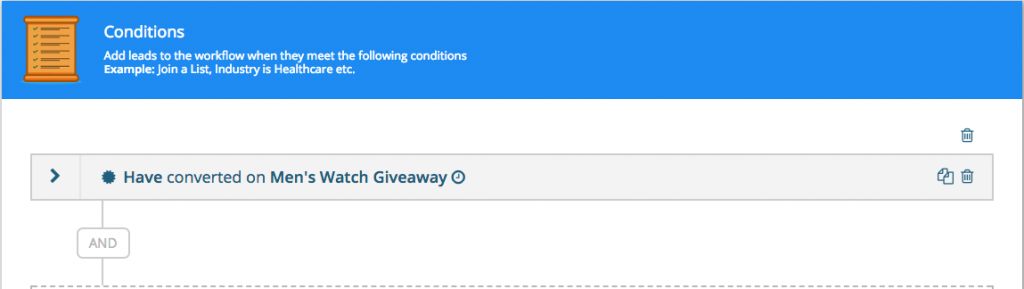
Step 2: Set the actions (assigning a new Lead Property to your leads) which will trigger when the conditions are met:
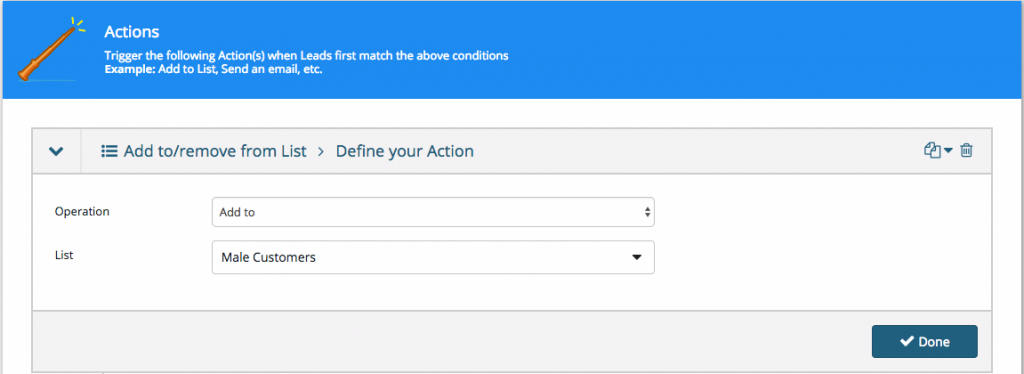
Step 3: Set the conditions for your segment:
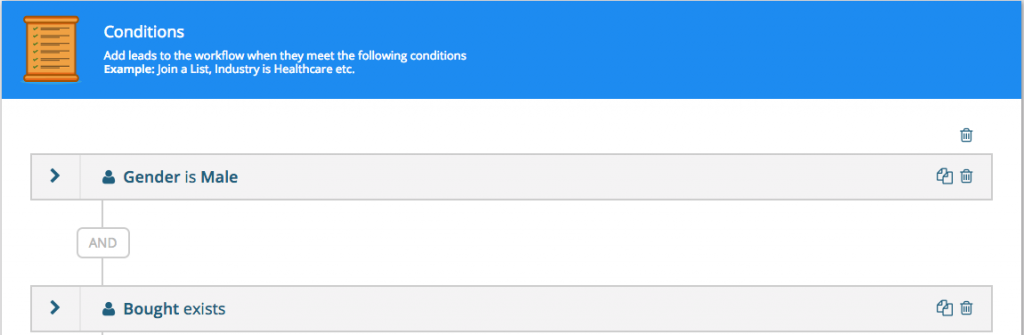
Step 4: Set the actions which assign your leads to that segment when the conditions are met:
Chapter 5:
7 Ecommerce Tools
1. Wishpond
Wishpond’s marketing software enables your ecommerce company to create everything from entry popups and product sales pages to “abandoned cart” emails. Automated marketing campaigns make it easy for your ecommerce company to generate business leads through opt-in bars or social media promotions, and then follow up with segmented, targeted email.
Recently, we’ve made all our popup tools (that’s welcome mats, entry, exit, slide-in popups and 4 other types) totally free. Want to get more sales from your website traffic? Start adding popups today.
2. Have2HaveIt or Like2Buy
By automatically creating an Instagram-focused sales page, featuring the products in your posts, these tools make it easy for your business to sell from social media.
3. Sourcify
For businesses just getting into the ecommerce world, Sourcify helps to get set up with wholesalers, Asian suppliers, sampling and more.
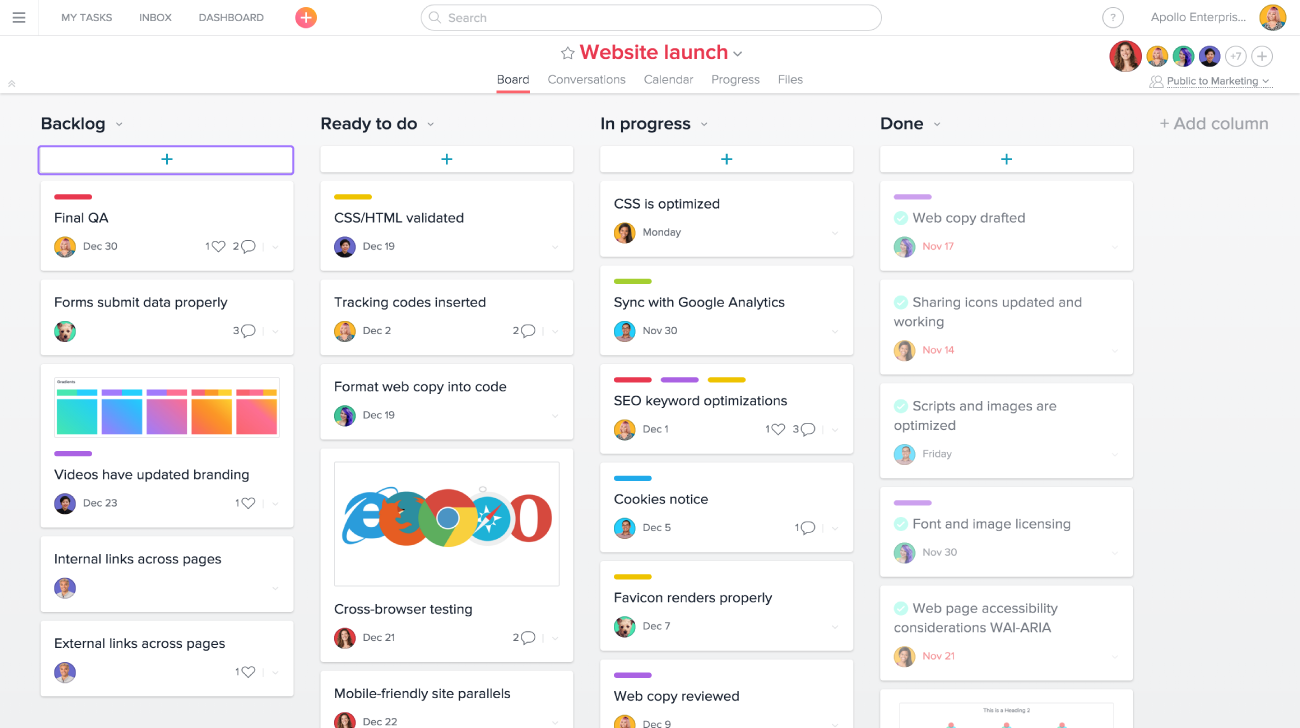
4. Asana or Trello
If you have a multi-person team, a project management tool like Asana or Trello is essential. When you’re building your campaign, you can use these tools to brainstorm ideas, move mockups to a designer, review, amend and assign tasks quickly and easily.
5. Smile.io
Smile.io is a Shopify app which makes it super easy to create rewards and referral programs, as well as general gamification strategies.
If you’re in the pre-launch, early or “Kickstarter” phase, a solid referral program is a great way to drive awareness and reach new prospective customers.
6. Zapier
If you’re using a piece of software that doesn’t connect with another piece of software you use (like if you use a platform which isn’t Wishpond to create your popups, and you want to email your leads with Mailchimp) Zapier will connect the two tools.
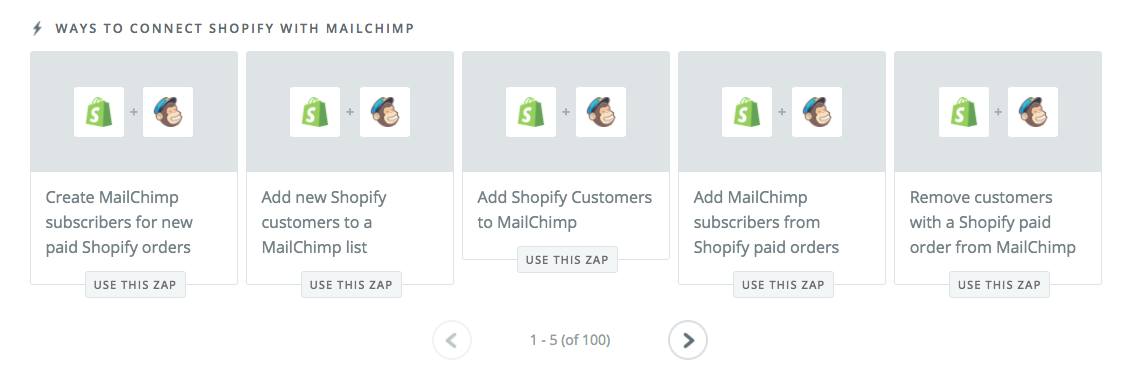
Wishpond, by the way, is both integrated with Zapier as well as all the leading email and CRM platforms (as well as having its own email tool, of course).
For more on this, check out Zapier’s own “101 Ways to Use Zapier (Ecommerce).“
7. Canva or Google Drawing
Need to create a social media image post or new Facebook ad image, but don’t have an in-house designer or a whole lot of graphic design experience?
You’re not alone – and that’s why Canva and Google Drawing exist. Both platforms make it easy for your business to create professional-looking graphics from scratch or (in the case of Canva) from dozens of different templates.
Chapter 6:
Conclusion and Related Reading
Creating an ecommerce business is hard. There’s a lot of competition, and the “big guys” can seem like an overwhelming obstacle you can’t possibly compete with.
The truth is, though, that all you need to do is offer something that nobody else is. And I’m not just talking about your product.
If you can create an experience on your website, deliver value, design, support and a product people love, you will find success.
Don’t get me wrong, it’s not an easy road. But ecommerce businesses offer something no other business does: a way for you to make money while you sleep.
Set it all up: Create the optimized website, and drive traffic to it with advertising. Create the promotions, product pages and campaigns and start spreading the word intelligently. Then, once people get there, create the tools which get their lead information, convert as many of them as possible, and recover the ones who leave.
Then, once it’s all set up, you’re done. Relax in the bath, knowing that you’ve created something which drives traffic, converts it, and then sends the product the person has bought, all while you’re drinking a glass of wine in the bubbles.
Have any questions about anything you’ve read in this resource? Don’t hesitate to send an email to content@wishpond.com, or reach out to us on Twitter @wishpond and @jdscherer.
Related Reading:
- A Step-by-Step Walkthrough of a Complete B2C Marketing Campaign
- How to Create a Marketing Campaign (That Actually Drives Sales)
- 101 Big-Brand Popups: 9 Ways to Improve Your Lead Generation
- 23 Beautiful Ecommerce Landing Page Examples (2017)
- Everything You Need to Create a Winning Facebook Marketing Strategy
- 52 Facebook Marketing Ideas
- 50 Fun Contest Prize Ideas